IIc+ Universal PSU: Difference between revisions
Khaibitgfx (talk | contribs) |
Khaibitgfx (talk | contribs) |
||
| Line 90: | Line 90: | ||
== Reviews == | == Reviews == | ||
May 23rd, 2018 | |||
Javier A. Rivera published a Call A.P.P.L.E. article about the IIc Plus Universal PSU:<br> | |||
https://www.callapple.org/vintage-apple-computers/apple-c/new-reactivemicro-iic-plus-universal-power-supply/ | https://www.callapple.org/vintage-apple-computers/apple-c/new-reactivemicro-iic-plus-universal-power-supply/ | ||
May 23rd, 2018 Javier A. Rivera received the first prototype and did a simple set of pictures documenting the install procedure to help others. Thanks Javier for the help!<br> | May 23rd, 2018 | ||
Javier A. Rivera received the first prototype and did a simple set of pictures documenting the install procedure to help others. Thanks Javier for the help!<br> | |||
https://www.facebook.com/groups/5251478676/permalink/10157496148403677/ | https://www.facebook.com/groups/5251478676/permalink/10157496148403677/ | ||
Revision as of 14:48, 5 August 2020

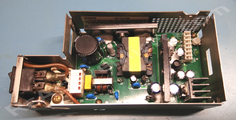
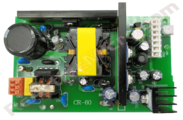
The Apple IIc Plus Universal PSU is a Power Supply replacement designed by ReActiveMicro to be installed by the end user. It replaces the old Power Supply PCB with a new, modern solution while reusing the old Power Supply Enclosure.
The Apple IIc Plus Universal PSU was conceived, created, and designed by Henry of ReActiveMicro and released for sale to the Apple II Community on September 29th, 2018. Mark Wise however originally had a clone produced back in 2014 which he offered for sale on the Apple II facebook group in 2014. Mark however was unable to have new units produced so ReActiveMicro stepped in to help fill the need in the Community.
When do you need a new power supply?
Good question! Although the answer should be obvious. Is it the original, 30+ year old PSU that came with the Apple? Then you need a new one. That simple.
"Rebuild or replace. Don't reuse." - ReActiveMicro.
How much more do you want or expect from a piece of equipment that was only designed to last a few years at most? Do you really believe Apple designed the power supply to last 30+ years? Most people are either unaware of the potential dangers of continuing to use an old PSU or are of the mindset "If it ain't broke, don't fix it." Luckily when most Apple II power supplies fail they don't cause damage, or at least none which is apparent. However there is growing evidence that when some power supplies fail the Apple II system in which they failed start to have intermittent issues a period of time after the failure.
It is highly recommended to fully rebuild your power supply or install a Universal PSU Kit. You should NOT rely on an original power supply in any case, or even one 'only' 10 years old, as it can be unreliable. It is also very hard, if not impossible, to fully test a power supply using common bench top tools. Labs use very expensive and specialized equipment specifically made for testing power supplies to certify and calibrate them. Transcat is one such company which not only calibrates your power supply but also documents how and why it fails certain tests. Costs however can range into the upper hundreds of dollars which is why most users decide to replace their power supply with something new and known good, or attempt a rebuild. However without the tools or knowledge to fully test and calibrate a rebuild you're back to just assuming things are working correctly.
Product Status: Actively sold by ReActiveMicro.
Support: Post on the Discussion page (link above) or email ReActiveMicro Support.
Sales: Visit the ReActiveMicro Store.
Features Of The Universal PSU Kit
- Fits all Apple IIc Plus Power Supply Enclosures.
- Meets or surpasses all Apple IIc Plus power requirements.
- Modern PSU design.
- Standard 2 year warranty.
- Universal PSU operates on a wide range of input power: 90-264VAC, 47-63Hz.
- On-board Power LED shows when AC is applied to the Universal PSU and is working.
- Constant Voltage design.
- Runs cool/low heat output: Operates cooler than the original Apple IIc Plus PSU.
- Cleaner and more consistent power than the original Apple IIc Plus PSU.
- More efficient than original Apple PSU.
- Fused AC Over Current/Over Voltage/Surge protection.
- DC Over Voltage protection (active crowbar design), and auto restart.
- Fully UL/CE Certified and tested design.
- All units fully stress-tested/burned-in at 90% loading before shipping.
- Kit is “reversible”. You can downgrade your Enclosure back to its original state if desired in the future.
Pre Installation Notes
Thanks for your support by purchasing your IIc+ Universal PSU from ReActiveMicro! To install your IIc+ Universal PSU you can reference the links below on this page which are the most up to date information, edited and reviewed by Community members like yourself. And in return, should you find something on this page that could be worded or documented better you are invited to create an account and edit things as you see fit. Please feel free to share your experience to help others, as others have shared their experiences to help you.
Generally the Kit can be installed in about 15 minutes and with only light skimming of the installation section on this page. And of course if you have any issues or questions please contact Support.
Tools Required:Philips Screwdriver, Small Slotted Screwdriver, Wire Cutters/Strippers, and Multimeter.
ALWAYS be sure to disconnect all power from your power supply before opening and upgrading the unit. And be sure to double and triple check the DC output voltages before reconnecting the power supply to your Apple II system. Rechecking will never be a bad idea and we always recommend it.
IMPORTANT NOTES: The Universal PSU design has an adjustable Output Voltage Potentiometer. It comes preset from the factory and locked in place with security adhesive. We HIGHLY RECOMMEND not adjusting it under any circumstances as it could cause damage to your Apple II and void your Universal PSU warranty. Only those with knowledge or need should ever adjust. You have been warned.
PSU Installation
BEFORE YOU BEGIN BE SURE TO DISCONNECT THE AC POWER CABLE.
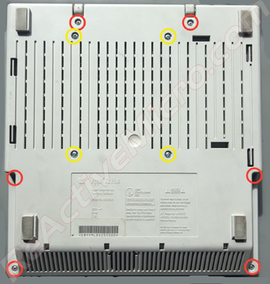
- Turn the IIc Plus upside down and remove the screws from the bottom of the case. The 6 red circled screws hold the top case on. The 4 yellow circles hold the floppy drive in. You don’t need to remove the floppy drive screws at this stage, but it can be useful and you may find it easier for the upgrade process.
- Turn the IIc Plus right side up and remove the top cover. Once the top of the IIc Plus is removed you will see the Power Supply enclosure. You will find it held in place by a plastic clip at each end. Hold the clips open one at a time to remove the enclosure.
- Now that the Power Supply enclosure has been removed you can remove the two screws holding the cover in place. They are located on the enclosure sides. Once the screws are removed open the cover of the enclosure to expose the original Power Supply PCB.
- There will be two screws securing the PCB to the enclosure which need to be removed. Once removed the original can be lifted from the enclosure.
- Using wire cutters you can cut the AC wires connecting to the original Power Supply PCB. This will free the PCB from the enclosure.
- The new IIc+ Universal PSU has a "spring" connector on the AC end of the PCB. All that needs to be done is hold down the small spring tab, fully insert the wire, and release the spring tab. The connector will bite in to the wire and hold it in place firmly. You may find installing the wires now a bit simpler than installing the PSU first and then connecting the wires later.
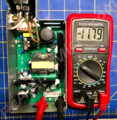
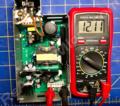
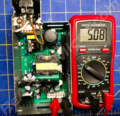
Strip back both AC wires about 1/4" (6mm) and insert in to the correct locations on the connector. Hold down the small tab on the spring corrector, push the wire in, and release the tab. Pull gently on the wire to ensure it is correctly inserted in to the spring connector. If it pulls out, try to reinstall it and pull on it again. If it comes out again then strip a little more of the insulation from the wire and repeat the above process. - Now would be a good time to recheck all your connections to make sure they are secure and wired correctly. If you have a multimeter it would be best to perform a “continuity test” on all connections as well. You can also now connect the Power Supply to an AC outlet and turn on the Universal PSU, with the enclosure open and not connected to your Apple, and use the multimeter to check the output voltages as referenced above. There is a Power LED next to the DC Output Connector which will help aid in confirming AC is correctly connected to the Universal PSU and turned on.
CAUTION: Do not directly touch the Universal PSU or its parts for any reason when AC power is applied as electrical shock can and will occur. Be sure to wait at least 10 seconds after AC power has been disconnected before directly touching.-
-12v Measurement
-
+12v Measurement
-
+ 5v Measurement
-
- Assuming all the checks pass from the last step you can replace the enclosure cover. Next, reinstall the enclosure back into the IIc Plus. Last is to reinstall the case screws. Done! Enjoy another 10+ years of trouble free, clean DC power in your Apple II/+/e or Clone computer. And rest assured knowing you have made the best decision possible in extending and protecting the life of your Apple.
Reviews
May 23rd, 2018
Javier A. Rivera published a Call A.P.P.L.E. article about the IIc Plus Universal PSU:
https://www.callapple.org/vintage-apple-computers/apple-c/new-reactivemicro-iic-plus-universal-power-supply/
May 23rd, 2018
Javier A. Rivera received the first prototype and did a simple set of pictures documenting the install procedure to help others. Thanks Javier for the help!
https://www.facebook.com/groups/5251478676/permalink/10157496148403677/
Versions
The prototype IIc Plus Universal PSU was produced on March 12th, 2018. Two units were produced. It featured an MTA156 connector on the AC side. Although this worked it was a bit more cumbersome than it needed to be. It was decided the connector would be changed and a production run of PSU be ordered.
v1.0 of the IIc Plus Universal PSU was produced on May 6th, 2018. The AC connector was changed to a spring type which makes installation of the wires much simpler for the user.

