Replica 1: Difference between revisions
Khaibitgfx (talk | contribs) mNo edit summary |
|||
| (5 intermediate revisions by 2 users not shown) | |||
| Line 6: | Line 6: | ||
The ReActiveMicro Replica 1 was created by Vince Briel of [http://www.brielcomputers.com BrielComputers.com] in 2003 with the more advanced Replica 1 Plus being created in mid 2014. Briel Computers specialized in retro hobby computer kits. They started in 2003 with a replica of the first Apple Computer, the Apple 1. Briel Computers focused on developing computer kits and boards like those you could purchase in the 1970′s and early 80′s. | The ReActiveMicro Replica 1 was created by Vince Briel of [http://www.brielcomputers.com BrielComputers.com] in 2003 with the more advanced Replica 1 Plus being created in mid 2014. Briel Computers specialized in retro hobby computer kits. They started in 2003 with a replica of the first Apple Computer, the Apple 1. Briel Computers focused on developing computer kits and boards like those you could purchase in the 1970′s and early 80′s. | ||
As of 2015 Briel Computers ceast operations and stopped accepting orders.<br> | |||
In September 2017, ReActiveMicro contacted Vince about reproducing the Replica 1 Plus and was once again made available for sale by ReActiveMicro. | In September 2017, ReActiveMicro contacted Vince about reproducing the Replica 1 Plus and it was once again made available for sale by ReActiveMicro. | ||
| Line 142: | Line 142: | ||
[http://school.anhb.uwa.edu.au/personalpages/kwessen/apple1/Krusader.htm KRUSADER] is a program written to allow assembly language development on the Replica 1. It is included with the current distribution from ReActiveMicro within the Integer ROM selection. Be sure the "ROM SEL" jumper is OFF to select Integer. Then type "F000R" at the prompt and press Enter to start Krusader. If it fails to run then press you Caps Lock, Control, Alt, etc keys then retype and press Enter. Some keyboard don't play well with the Replica 1 and pressing these extra keys can sometimes reset the keyboard to better sync to the Replica 1. | [http://school.anhb.uwa.edu.au/personalpages/kwessen/apple1/Krusader.htm KRUSADER] is a program written to allow assembly language development on the Replica 1. It is included with the current distribution from ReActiveMicro within the Integer ROM selection. Be sure the "ROM SEL" jumper is OFF to select Integer. Then type "F000R" at the prompt and press Enter to start Krusader. If it fails to run then press you Caps Lock, Control, Alt, etc keys then retype and press Enter. Some keyboard don't play well with the Replica 1 and pressing these extra keys can sometimes reset the keyboard to better sync to the Replica 1. | ||
== | == Learning 6502 Machine Code == | ||
The following article is a walkthrough that teaches you how to design and enter a program into memory from scratch using only the Apple 1 monitor. It is a good way to understand the coding experience of Apple 1 owners in the late 1970s. | |||
<gallery class="center" widths=150px heights=80> | |||
File:PDF_ICON.svg|Learn to Program an Apple 1|link=https://wiki.reactivemicro.com/images/e/ec/LearnToProgramAnApple1.pdf | |||
</gallery> | |||
[[Category:Hardware]] | [[Category:Hardware]] | ||
[[Category:Apple]] | [[Category:Apple]] | ||
[[Category:ReActiveMicro Projects]] | [[Category:ReActiveMicro Projects]] | ||
Latest revision as of 13:14, 11 April 2021
The ReActiveMicro Replica 1 was created by Vince Briel of BrielComputers.com in 2003 with the more advanced Replica 1 Plus being created in mid 2014. Briel Computers specialized in retro hobby computer kits. They started in 2003 with a replica of the first Apple Computer, the Apple 1. Briel Computers focused on developing computer kits and boards like those you could purchase in the 1970′s and early 80′s.
As of 2015 Briel Computers ceast operations and stopped accepting orders.
In September 2017, ReActiveMicro contacted Vince about reproducing the Replica 1 Plus and it was once again made available for sale by ReActiveMicro.
Product Status: Actively sold by ReActiveMicro.
Support: Post on the Discussion page (link above) or email ReActiveMicro Support. The Briel Computers forums also hold a wealth of information.
Sales: Visit the ReActiveMicro Store.
Kit Assembly
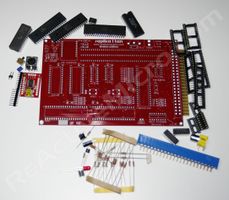
The parts included with your Replica 1 kit and the PCB have basic labels. Those with intermediate knowledge should have little trouble assembling the kit from just these labels. The image of the Replica 1 can also be used for reference or to help determine orientation.
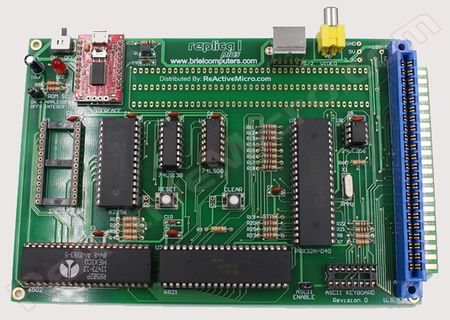
The manual also has the full assembly instructions. See chapter 4, page 12.
To assemble your kit we recommend adding parts in groups and then soldering them. This will be the fastest way to assemble the kit rather than adding one part at a time then soldering it.
- Start with the small passive parts like caps and resistors. Some of the location labels will be hard to see if you start with the sockets or other parts. Each time a part is added you can simply bend over a leg on each side to help hold the part to the PCB which allows the board to be turned over and prevents parts from falling out. It is most simple to load all the parts in groups and then solder and clip the legs as needed.
- Once the passive parts are installed next should be the IC sockets. When a socket is loaded on the board bending the corner pins of the sockets helps hole it to the PCB which allows group loading and soldering. The sockets are all the same thickness. So if you solder on a flat surface then this will also help hold all the sockets flat to the PCB and give a more uniform appearance when completed. Be sure ALL pin 1 'notches' are facing the correct way! See the silk screen markings on the PCB to ensure the correct orientation.
- End with the larger parts, like jacks, the large cap, and the header pins. Don't bend over the jack legs or pin legs as they will be too stiff. The jack's legs are prebent also which should help hold it to the PCB. The rest you may need to hold the parts in place as you solder a few pins before you can group solder.
On July 19th, 2020 Joe Strosnider posted a build video of the Replica 1 Kit. A good vid to review before building your kit! We highly recommend watching it before starting your kit as well as fully reviewing this Wiki page.
A good loupe (magnifying glass) is recommended for helping identify and confirm parts, like the markings on some small caps. It also helps with solder joint inspection. An illuminated 40 x 25mm and a 35 x 50mm loupe are well worth the investment and can be had for about $10 each on eBay.
Some care needs to be taken when installing capacitors and diodes.
If your kit includes Aluminum or Tantalum capacitors, or "caps" for short, then be sure to install them in the correct orientation. The PCB will be clearly marked with "+" signs for all cap locations when the orientation of the part matters, or a polarized part is normally used. Sometimes a non-polarized part is used in place of a polarized one and then its orientation does not matter. However install a polarized cap backwards and you will damage it. An Aluminum Electrolytic will have a strip pointing to the NEGATIVE end lead. A Tantalum Electrolytic will generally have a marking or stripe to denote (not always pointing to) the POSITIVE lead.
- Install the 10uF Aluminum caps at locations C17 and C27. Be sure to install correctly as they are polarized.
All caps will have value markings on them. "106" is 10uF, and "104" is .1uF. 10uF is also typically physically larger than .1uF. This should help identify the ceramic caps in the kit. They along with the Electrolytic caps can also clearly be seen in the assembled pic above.
- Install a 47pF cap at location "C3 (COLOR TRIM)". This can be from any of the two pads on the right to the one pad on the left.
A diode also has a marking on it, and needs to be installed correctly as it only allows current to flow in one direction. Install it backwards and you won't usually damage it, however the circuit will no longer operate as intended. They can also clearly be seen in the assembled pic above.
- Install the diode at location CR1. Be sure to install with the line side down (towards the "A" row).
Show below are example illustrations of different caps, a diode, and their related markings.
-
Caps Markings
-
Diode Markings
Your kit also includes resistors. They should be the less precise "4 band" style which are typically 5% tolerance. You can also use the more precise "5 band" style which are typically 1% tolerance. Here are some charts on how to read them to help make matching locations on your PCB more easy.
-
4-band Resistor Markings
-
5-band Resistor Markings
Programming And Source Code
The most current source code for the Replica 1 is here. You can find older versions on Briel Computers's Downloads page. Users are encouraged to edit and tinker with the project, and experiment with coding and how the Replica 1 systems work. ReActiveMicro will also help implement any hardware changes needed in new board and circuit revisions. As new software becomes available we will host it here or add links to user's pages and repositories.
Powering the Replica l and programming the Propeller microcontroller requires a standard USB-A to Micro-USB cable. A serial console connection to FT232R board can also be established via the same cable.
All Replica 1 assembled or kit units from ReActiveMicro will come fully programmed and tested. No further programming will be needed unless you request a "blank" unit. The steps to programming the Replica 1 are as follows:
- If you have a blank 27128 ROM start by first programming it. All boards from ReActiveMicro come with programmed ROMs.
- Install P8X32A Propeller Tools. Run the program.
- Make sure the FT232R's (small USB board) micro-switch is set to 5V (left side).
- To test that the Propeller Tool sees the Replica 1:
- Connect Replica 1 to PC with USB cable. (If Windows: Driver will install).
- Turn on Replica 1.
- In Propeller Tool click "Run" menu, then "Identify Hardware...".
- It should report "Propeller chip version 1 found on COMx".
- To load firmware:
- Click on File menu, then "Open".
- Open the Replica 1's firmware folder and select the file "110REV03.spin".
- Click on the "Run" menu, then "Compile Current", then "Load EEPROM".
- If you DID NOT get an error message the firmware is programmed. Done!
Screen Noise Issue
A few users have reported every few seconds a "/" appears on their screen followed by a linefeed. This renders any data entry impossible. The issue isn't present when connected to a PC, or sometimes when the Replica 1 is powered on while the motherboard is sitting on pink ESD foam. This is mainly due to the fact the Replica 1 is being powered by a PSU with an isolated ground. Meaning the ground or common is NOT connected to the PSU's ground. So the Replica 1 acts like an antenna.
There are several options to resolve this issue. First, confirm the noise issue is related to an isolated ground issue. Simplest is to power the Replica 1 using a USB cable to a computer or laptop. These should supply a good ground. Another option wold be using a jumper wire/clip to connect the Replica 1 to ground. If the noise goes away and you can enter commands using the keyboard reliably then isolated ground is your issue.
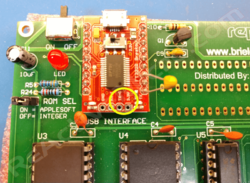
Other noise related issues could be needing the newest firmware: Reprogram the Replica 1 with the most current firmware. If this doesn't work try adding a 100k resistor to the USB module as pictured below. And if there is still noise then add a .1uF cap (100nF) to Pin28 of the Micro Controller to either Ground or +5v. The resistor and cap fix work for either firmware. However the firmware is usually the first thing to try since it's usually the simplest for most users.
It's simplest to reprogram the Replica 1, however we found that installing a 100k resistor on the Tx data line to the Propeller as a hardware fix as opposed to a software fix resolved the issue. As little as 10k can be used for +3.3v pullup, but anything smaller risks damage to the FTDI module. 100k is much safer in all regards. This helps hold the data line high. It seems the RX line is held high by default. And both lines are held high when connected to a USB data port, which is why the noise issue is not seen when connected to a PC.
You can connect the resistor most simply to the USB module. Or to the rear of the PCB to pin 39 (Tx) and pin 12 or 32 (+3.3v) of the Propeller.
-
Screen Noise Fix Solder Location
If the .1uF cap (100nF) to Pin28 of the Micro Controller is required, it would be most simple to connect between Pin1 and Pin2 of the ASCII keyboard connector, and place the 'ENABLE ASCII' jumper on. This doesn't even require soldering as the user can place the cap in the IC socket. However we recommend if this fixes the issue to solder the cap in place on the rear of the PCB.
History
Vince Briel started Briel Computers in 2003 as a result of high demand for replica 1 computers. It started out as a hobby to build a replica of a computer he could never own. Soon, Leander Kahney learned of his project and wrote an article for Wired Magazine.
At the time, the replica 1 was not finished and no response came from Apple about use of Woz's code. Then Woz was kind enough to allow use of the code, thus creating another article in Wired.
In 2015 Briel Computers closed its doors and stopped accepting orders as Vince had a career change and had little time left for the hobby business.
In September 2017, Henry from ReActiveMicro contacted Vince about reproducing his kits and projects for sale to help supply the current Community demand. Vince was more than happy to see his project live on and supplied ReActiveMicro with all the files needed to start production.
Versions
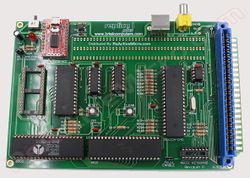
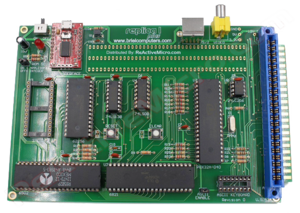
ReActiveMicro started producing Replica 1 Plus v1.0 in November of 2017. This version can be easily identified by the "Distributed By: ReactiveMicro.com" marking under the "replica 1" name in the middle top of the board. This version is a direct reproduction with no other edit or changes made.
-
Replica 1 Plus v1.0 from ReActiveMicro
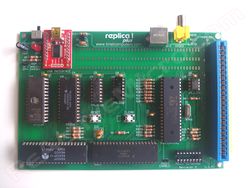
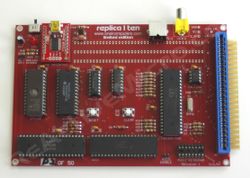
Here are some past versions of the Replica 1 board by Briel Computers.
-
Replica 1 Plus, Revision 0.
-
Replica 1 Ten, Limited Edition.
-
Replica 1 Ten kit, Limited Edition.
CPU
The Replica 1 normally comes with a 6502 CPU. The newer 65C02 can be used, however there is no benefit and the newer OpCodes will not be used unless the user calls them directly. This however is not "standard" and other 02 compatible software would not use the C02.
There were some bug fixes in the C02 CPU. Software could be written that exploited these bugs in the old CPU, however none are known. All of the known Apple 1 software should work fine on the C02 CPU.
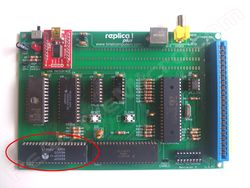
To identify which CPU you have installed on your Replica 1 look at U1 located on the lower left of the PCB. If the letter "C" is in the middle of the part number then it's a 65C02 CPU and not a 6502 CPU.
-
Replica 1 CPU Location
Applesoft BASIC
BASIC comes in ROM. Be sure the "ROM SEL" jumper is ON to select Applesoft. Then type "E000R" and hitting the Enter key. If it fails to run then press you Caps Lock, Control, Alt, etc keys then retype and press Enter. Some keyboard don't play well with the Replica 1 and pressing these extra keys can sometimes reset the keyboard to better sync to the Replica 1.
Krusader Assembler
KRUSADER is a program written to allow assembly language development on the Replica 1. It is included with the current distribution from ReActiveMicro within the Integer ROM selection. Be sure the "ROM SEL" jumper is OFF to select Integer. Then type "F000R" at the prompt and press Enter to start Krusader. If it fails to run then press you Caps Lock, Control, Alt, etc keys then retype and press Enter. Some keyboard don't play well with the Replica 1 and pressing these extra keys can sometimes reset the keyboard to better sync to the Replica 1.
Learning 6502 Machine Code
The following article is a walkthrough that teaches you how to design and enter a program into memory from scratch using only the Apple 1 monitor. It is a good way to understand the coding experience of Apple 1 owners in the late 1970s.
-
Learn to Program an Apple 1


