MicroDrive/Turbo


The MicroDrive/Turbo IDE Controller is a Mass Storage Device that is used with the Apple IIGS or Enhanced //e. It emulates a Hard Drive using solid-state Compact Flash Cards.
MicroDrive/Turbo (aka - MDT) is currently sold by ReActiveMicro. They sell it with a preloaded 256 MB Compact Flash Card to enable new users to start using the MicroDrive/Turbo right out of the box. Software included is GS/OS v6.0.1, IIGS Memory Testers, ShrinkIt (8 and 16 bit), Copy II+, MicroDrive Utilities, DiskMaker8, DSK2File, DOS.MASTER and different AE Memory Testers for your //e. Everything needed to start transferring and unpacking software from the Internet, and start using your Apple II once again.
Product Status: Actively sold by ReActiveMicro.
Support: Post on the Discussion page (link above) or email ReActiveMicro Support.
Sales: Visit the ReActiveMicro Store.
History
The MicroDrive/Turbo was designed by Joachim Lange of ///SHH Systeme and released in 1996. This was the first Apple II IDE Controller that used DMA.
In 2004 Gerber Street Enterprises started reselling select items from ///SHH Systeme, however the offering was only a couple of items and stock was very limited.
Mid-2006 ReActiveMicro took over reselling all ///SHH Systeme items in an effort to provide better service and a larger product variety to the Apple II Community.
Versions
Pre-2006 versions of the card were all hand assembled by Joachim Lange of ///SHH Systeme. After ReActiveMicro took over sales in 2006 the units were hand assembled by Henry from ReActiveMicro till mid 2015. ReActiveMicro then started their structured move to a more automated vendor and set their sights to have projects assembled on a larger scale. The MicroDrive/Turbo was the first such project to be fully assembled. However due to a learning curve and testing different vendors Henry continued to hand assemble some MicroDrive/Turbo units until 2016. During that year all projects moved to being fully assembled as well as offering kit versions of most projects.
From March 19th 2018 until the 25th ReActiveMicro had a sale in which they jokingly played on the fact that Henry "defaced" several cards by signing them. Thus the cards would be sold at a discount due to his signature being of negative value and actually subtracting from the total worth of the card. This was in fact a joke made from the recent CFFA3000 sales where Rich Dreher sold "limited edition" cards where he signed them and charged $200USD more. It's noteworthy that Henry was not actually thrilled with signing cards and "felt like a total ass" the entire time doing so. He's not into celebrity or thinking his signature or efforts are anything special. He's more happy being able to supply demand and knowing that products he makes are being used in the retro spirit. "Limited editions" or signed products will not be a staple in the ReActiveMicro.com future, and will always be made in a self deprecating fashion.
- Example of signed MicroDrive Turbo.
-
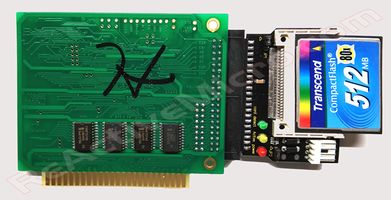 MicroDrive/Turbo From March 19th 2018 till the 25th Sale. 51 units signed total.

Features

DMA: Looking for the fastest storage solution available for your Apple II? The MicroDrive Turbo is faster that any other Mass Storage controller since it uses DMA for reads and writes. As the name implies, it performs Direct Memory Access which bypasses the CPU and allows for a whopping 40% faster read and write speeds when compared to conventional controllers. For example, with an accelerator installed in your IIGS you can boot GS/OS in as fast as 7 seconds! The DMA option can be disabled using the Setup utility.

40 Pin IDE Interface: The 40 Pin IDE interface on the MicroDrive/Turbo IDE is a standard 16 bit IDE port. It is capable of addressing "Primary" and "Secondary" IDs on the IDE chain.
IDE to Dual CF Adapter: The MicroDrive/Turbo comes standard with a 40 Pin IDE to Dual CF Adapter. Users can control which of the two CF Slots is "Primary" and "Secondary" using a Jumper on the Adapter. The Adapter however can be removed if so desired and a standard IDE Cable and devices attached.
Note: Dual mode unavailable when using the IIe Firmware; Only available when using the IIGS Firmware.

Compact Flash: Why use Compact Flash Cards? They are readily available, inexpensive, low power, noiseless, shock proof, removable, and last almost forever - things that can't be said about mechanical Hard Drives. However, it is still possible to use some older IDE Hard Drives with the MicroDrive/Turbo Controller if desired. See "Support: Using Mechanical Hard Drives" below. Do you download software from the Internet and wonder how to get it to your Apple II or spend lots of time doing so? With the MicroDrive/Turbo it's now super easy! Just remove the Compact Flash Card from your MicroDrive/Turbo, insert it in to your PC and using CiderPress (Windows only) you can read and write directly to the Compact Flash Card. Using your PC for transferring files and backing up has never been so quick and painless!
ProDOS 8 and 16: The MicroDrive/Turbo is ProDOS compatible. It's recognized as a 'standard' Mass Storage Device just like any Hard Disk Drive on your Apple II. Large Volume DOS 3.3 support is provided through the use of a program called DOS.MASTER (preloaded on CF Card).
Boot Options: By default, Volume 1 is set to boot. However when setting up a new CF Card the user sets which Volume they desire to boot. Or on an existing CF Card the Setup utility can modify the default boot Volume. However the MicroDrive/Turbo also offers a temporary option to boot to ANY volume. When powering on the Apple II the user will press and hold the Open Apple key. This will pause the MicroDrive/Turbo's splash screen. The user then presses the corresponding Volume's number key, and the MicroDrive/Turbo will boot to that Volume.
Apple IIGS and Enhanced //e Operation: The MicroDrive/Turbo comes standard with the Apple IIGS Firmware. You can however order one with IIe Firmware, or buy an upgrade ROM to convert a IIGS MicroDrive/Turbo for use in an Enhanced //e. For Apple //e use, the //e MUST be Enhanced. The HMicroDrive/Turbo does not not currently work in the Apple II, IIplus, or Apple ///.
Reviews
On October 13th, 2018 Russell McGhee did a comparison of the MicroDrive/Turbo (left) VS CFFA (right). The IIGS on the right has a TWGS installed and is part of the delay when the system is first powered on. However you can see the IIGS boot screen simply enough and can compare between the two.
On August 13, 2016 Joe Strosnider from the YouTube channel "Joe's Computer Museum" posted a review of several Mass Storage options for the Apple II, and the MicroDrive/Turbo was among them. He gives some very good feedback regarding the differences between the boards, and how the MicroDrive/turbo performs under real world conditions.
Support: Backing Up - Setup Utility
The first thing you should do before using your MicroDrive/Turbo is to make a backup of the MicroDrive/Turbo Setup Utility. Without this Utility you will be unable to re-setup your CF Card should it crash or you accidentally format it. It is advised to copy the Setup Utility to a backup floppy and keep it in a safe place. To backup the Utility:
- Upon booting the MicroDrive/Turbo you will be taken to Volume 1 which holds the ProDOS 8 utilities.
- You will see menu item named "COPYIIPLUS9.1". Using the arrow keys highlight the item and press Enter.
- Press the letter "C" to select "COPY", and the letter "F" for "FILES".
- Use the arrow keys to select the Slot where you installed the MicroDrive/Turbo, and "Drive 1". Press Enter.
- Use the arrow keys to select the Slot and Drive where your backup floppy is located. Press Enter.
- You will see a folder named "MICRODRIVE". Using the arrow keys highlight the folder and press Enter.
- You will see a file called "MICRODRV.SETUP". Using the arrow keys highlight the file and press Enter.
- Press the letter "G" to start the copy process.
Note: This assumes your Floppy Disk is preformatted with ProDOS. If not then you can use Copy II Plus to also format the Disk.
Support: IIGS Installation
When installing the MicroDrive/Turbo in your Apple IIGS a few things need to first be taken into consideration. For example, will you want to primary boot the MicroDrive/Turbo, your Floppy Drives, or other bootable devices installed in your system? For most installations users will want to boot primary to the MicroDrive/Turbo. In this case we recommend installing the MicroDrive/Turbo in Slot 7. And when you want to boot to the Floppy Drives hold
down the "ESC" key on boot. This allows the IIGS to "skip" booting the MicroDrive/Turbo and move on to checking the Floppy Drives or other bootable devices in lower numbered Slots.
For other configurations, the good news is that the Apple IIGS allows a lot of flexibility when it comes to booting. You will need to decide however what is the best to meet your needs. If not installing the MicroDrive/Turbo in Slot 7, then we usually recommend Slot 2. However by default the IIGS is set to use Slot 2 for a Modem. Since most users no longer use a Modem, Slot 2 is a good choice. However the default setting in the IIGS will need to be changed in order for the MicroDrive/Turbo to work.
To edit the settings or change the way your IIGS boots you will need to enter the Control Panel. There are a couple of ways to do this:
- Hold down the "Option" key on the keyboard and power on the IIGS. Select "1" for the Control Panel.
- Power on the IIGS and at anytime hold down the "Open Apple" and "Control" keys, then press the "ESC" key. Press "Enter" to select Control Panel.
Once in the Control Panel use the "Arrow" keys to select the "Slots" menu and press "Enter".
Most IIGS systems will be set to the default configuration, denoted by the "check mark" on the left of the option. Use the "Up" or "Down" arrow keys to select an option, then "Left" or "Right" arrow keys to set the option. Be sure to press "Enter" when done to save any changes.
For example, there is nothing needed to use the MicroDrive/Turbo in Slot 7. It is already defaulted to "Your Card". There is also no need to change the "Startup" option if it is set to "Slot 7" or "Scan".
If however you want to use the MicroDrive/Turbo in Slot 2 you will need to change the Slot setting to "Your Card". And if you would like the IIgs to boot the MicroDrive/Turbo in Slot 2 then you will also need to change the "Startup" option to "Slot 2". Be sure to press "Enter" when done to save any changes.
The "Startup" option in the Control Panel allows you to control how the IIGS checks for bootable devices when powered on. "Scan" will tell the IIGS to look from Slot 7 to Slot 1. Selecting "Slot [X]" will tell the IIGS to ONLY boot that Slot. If no bootable devices are found then the IIGS will report "Check startup device!" You can however tell the IIGS to boot from another Slot by breaking into BASIC (hold down the "Control" key and press the "Reset" key), then type "PR#X" and press the "Enter" key. "X" is the Slot number.
Note: The MicroDrive/Turbo allows the IIGS to "skip" trying to boot it by holding down the "ESC" key on boot.
Support: //e Installation
When installing the MicroDrive/Turbo in your Apple //e a few things need to first be taken into consideration. For example, will you want to primary boot the MicroDrive/Turbo, your Floppy Drives, or other bootable devices installed in your system? For most installations users will want to boot primary to the MicroDrive/Turbo. In this case we recommend installing the MicroDrive/Turbo in Slot 7. And when you want to boot to the Floppy Drives hold down the "ESC" key on boot. This allows the //e to "skip" booting the MicroDrive/Turbo and move on to checking the Floppy Drives or other bootable devices in lower numbered Slots.
If however you install the MicroDrive/Turbo in another Slot then it may not boot and depends on what other bootable devices are installed in your //e. You can however tell the //e to boot to another Slot by breaking into BASIC if needed (hold the "Control" key and press the "Reset" key), then type "PR#X" and press the "Enter" key. "X" is the Slot number.
Note: The MicroDrive/Turbo allows the IIGS to "skip" trying to boot it by holding the "ESC" key on boot.
Support: Trouble Shooting
Here are some tips on where to start if you experience any issues with your MicroDrive/Turbo (MDT) or any cards in your Apple II system.
First and foremost - ALWAYS always worth mentioning be sure to observe correct ESD protection when handling or touching electronics or you will damage and weaken ICs. It would be great if a damaged IC failed instantly. However that's rarely the case. ESD damage usually eats away at the gates inside an IC, can cause timing issues, and the IC to run hotter than designed for. This causes the IC to operate unreliably. And the worse kind of issue to diagnose is an inconsistent one. So please always use a grounded wrist strap and even a static mat when working on your IIgs. ReActivceMicro sees quite a few systems with weak or damaged bus transceivers (LS/HCT245) and can usually repair the motherboards, and ESD damage is the primary suspect for the ICs needing to be replaced. ALWAYS observe correct ESD protection when handling or touching electronics. However before suspecting the Apple II, let's retest the MDT in-system.
Start with cleaning the MDT's edge connector (slot connector end with the gold fingers). A pencil eraser is a good device for cleaning. You could also use some 95+ alcohol and a paper towel. When clean all the fingers should be about the same color and brightness. Any which appear to be dull or darker than the rest need to be recleaned as they could have some residue on them from manufacturing. This could cause connection issues with the slot.
Next, check your outlet power. Check to make sure the outlet is wired correctly. ReActiveMicro receives about 5 support emails a year from users with MDT issues who all swear their power is fine and there's no power or wiring issues. After much debate and discussion Support usually sends an outlet tester to which they finally check the outlet and discover there's a wiring fault and the cause of most or all of their past issues. The older original PSUs don't seem to mind a wiring issue, however the new ones ReActiveMicro sells will produce all kinds of issues if an outlet is incorrectly wired. So we ask that users check their outlets with a multimeter or outlet tester (eBay for under $10 delivered) to make sure issues are not power related. As another good way to check is to run a power cord from your bathroom or kitchen GFCI outlet and retest your II for a while, as these outlets have be to wired correctly in order to turn on. This is a simple way to help rule out a power issue and highly recommended in all testing situations where power is suspect.
Next we ask that you run the Read Write test software for the MDT. It's under the Utils folder, in the Microdrive folder, called TURBO.RW.TEST. It's a system file so you can use the ProDOS selector to run it. Let the test run for an hour or two. This should confirm the MDT is running well. If the test randomly fails or stops during this time then this might suggest an issue with Apple II. You can also try performing the 'twist test' and 'wiggle test' with the MDT during this time and see if the board fails. Tap and wiggle the IDE to CF Adapter and CF Card. See if the test stops and reports an error. If so then reseat the Adapter and CF Card several times to clean the connectors. The MDT should work well however, and you should be able to bend/stress the card slightly and press on the ICs while the test is running without any issues (assuming your slot is good). Too much pressure or shaking can cause the card to lose contact with the slot. So don't be too aggressive, but you'd be surprised at the amount of pressure and bumps you can apply without issues. Which is perfect to make sure it's no a connection issue. And 'twisting' the card helps confirm there isn't a cold solder joint. Again, don't be too aggressive, but you should be able to a decent amount of force to stress the board ends in both clockwise and counter clockwise directions. If the board fails during this test then it might suggest a cold solder joint.
Lastly, clean the card with some degreasor and an old toothbrush. Be sure to pull the firmware ROM and remove the CF to IDE Adapter before cleaning. Only clean the MDT board without the ROM installed. A good solvent like Brakleen is best. This also dries residue free. Rinse well with cleaner too. Use plenty of cleaner and mainly brush the small square IC in the middle of the board in all directions for at least 1 minute. Work the toothbrush in to the small pins with a combing action. The more brushing the better, and the more solvent used the better. Also clean inside the firmware ROM socket well. Brush around the surface mount pins where they connect to the PCB as best you can. You can also use 95+ alcohol and a toothbrush. However you'll need to rinse the card in water to fully clean it. Distilled water is best. Tap water is usually fine too. Be sure to tap the card's edges well on a hard surface to get the water out from under the ICs, and then use a hair dryer to fully dry the card for 5-10 mins. You can also leave the board out overnight to air dry, however this usually isn't needed. Canned or compressed air also works well do help get water out from under the ICs and dry the board.
If the MDT passes the twist and bump tests but fails randomly then it could be related to the IIgs. ReActiveMicro will usually send another MDT so users can retest locally to help confirm it's the II or the MDT. If the new MDT board also fails then it's your IIgs system which is the issue. Which at that point you may want to consider sending us your motherboard for additional confirmation testing and we can replace the bus transceivers if needed then send back to you for additional local testing. This kind of repair is about $100 however, and really should be a last resort effort. So let's see what the first few tests show us before pointing fingers at the IIgs mobo.
Support: Backing Up - CF Card
One important feature of the MicroDrive/Turbo the ability to remove the CF Card and use CiderPress to back up the Volumes on it. To do this you will need to have installed CiderPress on your PC or Mac running a Windows emulator, and a CF Card Reader.
See "Support: CiderPress" below for the download link and continued instructions on how to use it to backup the CF Card.
For 32Meg volume images or whole CF Card images visit the 32 Meg Hard Drive Image page and the download links below.
Support: Using the Setup Utility
Installation: The MicroDrive/Turbo comes pre-setup. Just install in any Slot. We however recommend Slot 7 if possible since you will most likely want to boot from the MicroDrive/Turbo much more often than your Floppies. And when you want to boot to a Floppy:
- On boot, press and hold the ESC key. This will bypass the MicroDrive/Turbo on boot.
Note: IIGS users may need to make a change to Slot settings in the Control Panel. To access the Control Panel first boot the IIGS. Then press and hold down the Open Apple key, Control key, and then press the ESC key.
Setup Utility: Be sure to backup the MicroDrive/Turbo Setup utility to floppy! This disk will be for backup purposes or if you need to setup a new CF Card.
- Upon booting the MicroDrive/Turbo you will be taken to Volume 1 which holds the ProDOS 8 utilities.
- You will see a folder named "SHRINK.IT". Using the arrow keys to highlight the folder and press Enter.
- You will now see a file called "SHRINK.IT.V3.4". Press Enter to execute it.
- Press the letter "O" to open an archive. The "MICRODRV.IIE.S1" is for a 5.25” disk, and "MICRODRV.TURBO" is for a 3.5” disk. Select one and press Enter twice.
- Next select the Drive on which to write.
- When done be sure to boot the disk and run the Setup utility to make sure it restored correctly.
- Repeat the above process if needed.
- Done!
Note: If you require a Setup utility disk be mailed to you, there will be a charge. Please email ReActiveMicro Support for details and pricing.
Check The DMA Setting: It is advised to check the DMA setting in the Setup utility to make sure it is set correctly. Usually there isn't any issue, however you can experience data corruption or loss if the setting is not correct.
- Upon booting the MicroDrive/Turbo you will be taken to Volume 1 which holds the ProDOS 8 utilities.
- You will see a folder named "MICRODRIVE". Using the arrow keys highlight the folder and press Enter.
- You will now see a file called "MICRODRV.SETUP". Press Enter to execute it.
- Press the letter "D" to select "DMA Mode". If it's set currently to your Apple II, then you are finished. If not, then continue to the next step.
- Press Enter to change the setting. For //e users select "Enable".
- Press the letter "W" to select "Write Configuration".
- Press Enter, then the letter "W" to save the new configuration.
- Done!
Note: Set DMA Mode To "Disable" to see how much slower your system would be using a non-DMA Mass Storage Device.
The Pre-setup and Pre-loaded CF Card: The MicroDrive/Turbo comes with a pre-setup CF Card which has 4 ProDOS Volumes on it. The CF Card comes pre-loaded the same for the IIGS or //e.
- Volume 1 has ProDOS 8 Utilities loaded on it and is bootable into ProDOS 8.
- Volume 2 has GS/OS v6.0.1 loaded on it and is bootable. You will need at least 1Meg of RAM in order to RUN GS/OS or you will be forced to exit.
- Volume 3 had DOS.MASTER loaded on it and is bootable into ProDOS 8 which loads BASIC. You will see a folder called DOS.MASTER.
- Volume 4 is formatted in ProDOS and is not bootable.
You can setup more volumes on the CF Card if you wish, however you will quickly run out of "Slots" under ProDOS 8. ProDOS maps each Volume to a Slot and Drive, the same as what is done with the Floppy Drives. So the current 4 Volumes take up 2 Slots, which have 2 Drives each. If you don't have many peripheral cards in your Apple II then adding more Volumes may not pose an issue. However users which have other devices in Slots which get a Volume mapped to them may not be able to use the card or the Volume. You have been warned.
Boot To Other Volumes: The MicroDrive/Turbo comes set to boot to Volume 1 by default. You can however temporary boot to other Volumes on the CF Card.
- Hold down the "Open Apple" key when powering on the Apple II. This will pause the MicroDrive/Turbo's splash screen.
- Lastly press the corresponding Volume's number key, and the MicroDrive/Turbo will boot to that Volume.
You can also use the Setup utility to make booting to another Volume the current setting.
- Upon booting the MicroDrive/Turbo you will be taken to Volume 1 which holds the ProDOS 8 utilities.
- You will see folder named "MICRODRIVE". Using the arrow keys highlight the folder and press Enter.
- You will now see a file called "MICRODRV.SETUP". Press Enter to execute it.
- Press the letter "B" to select "Default Boot Volume".
- Press Enter to change the setting to the desired NEW boot Volume.
- Press the letter "W" to select "Write Configuration".
- Press Enter, then the letter "W" to save the new configuration.
- Done!
Adding Volumes To CF Card: To add more Volumes to your CF Card.
- Upon booting the MicroDrive/Turbo you will be taken to Volume 1 which holds the ProDOS 8 utilities.
- You will see a folder named "MICRODRIVE". Using the arrow keys to highlight the folder and press Enter.
- You will now see a file called "MICRODRV.SETUP". Press Enter to execute it.
- Press the letter "E" to select "Partition Editor". You will immediately be taken to the "Partition Table" area on the right side of the screen.
- Press the letter "A" to add a new Volume. Note: Press the "?" key for available commands.
- Press and hold both "Apple" keys, then press the "Right Arrow" key. The "Blk Size" and "Dec/Hex" column values will start to change.
- Keep pressing the "Right Arrow" key till the "Blk Size" reads "$010000". Release the "Apple" keys.
- Press the "Left Arrow" key once. The "Blk Size" should now read "$00FFFF".
- Note: ProDOS can only use UP TO 32Megs of space. "$00FFFF" is 32Meg in Blocks. You can create volumes larger then 32Megs however you will may not be able to use them.
- Press the letter "D" to delete any volumes or to start over.
- Press the letter "Q" twice if you DO NOT want to save your changes and exit.
- Repeat the above steps if you want to add more Volumes.
- Press the letter "W" to select "Write Configuration".
- Press Enter, then the letter "W" to save the new configuration.
- Done!
Note: Don't forget you will need to format any new Volumes before they can be used to store anything.
Deleting Volumes From CF Card: To add more Volumes to your CF Card.
- Upon booting the MicroDrive/Turbo you will be taken to Volume 1 which holds the ProDOS 8 utilities.
- You will see a folder named "MICRODRIVE". Using the arrow keys highlight the folder and press Enter.
- You will now see a file called "MICRODRV.SETUP". Press Enter to execute it.
- Press the letter "E" to select "Partition Editor". You will immediately be taken to the "Partition Table" area on the right side of the screen.
- Use the "Arrow" keys to select the Volume you want to delete.
- Press the letter "D" to delete the Volume.
- Press the letter "Q" twice if you DO NOT want to save your changes and exit.
- Repeat the above steps if you want to add more Volumes.
- Press the letter "W" to select "Write Configuration".
- Press Enter, then the letter "W" to save the new configuration.
- Done!
Setting Up a New CF Card: To use a new CF Card (or one that has been accidentally formatted on your PC) you must first partition it. However if you do not have an existing bootable CF Card or a backup of the MicroDrive/Turbo Setup Utility on Floppy Disk then you will need to contact Support (see above) in order to obtain a new CF Card which is preloaded, or a Diskette with the Setup Utility.
If you have the Setup Utility then see Adding Volumes To CF Card: above.
Support: Need to Add/Complete
Format issues with C2+
Using a Second CF Card Slot:
Copy files.
Support: CiderPress - Backing Up and Restoring
Please visit http://a2ciderpress.com to download and install CiderPress for Windows or http://retrocomputingaustralia.com/rca-downloads/ for Mac (thanks to Michael Mulhern for his efforts and hosting). Your PC will also require a CF Card Reader so you can access the CF Card.
Backing Up A CF Card: To backup a Volume on a CF Card:
- Insert the CF Card into your Reader. Allow a few seconds for it to be recognized by your OS. DO NOT format the Card if prompted!
- Open CiderPress.
- Click on the "Tools" menu and select "Volume Copier (open volume).
- Select “Physical Disk X”. X is the disk number. Click the "OK" button to continue.
Note: Users with a Computer that has more than one Hard Drive or CF Reader will have to determine exactly which Drive the CF Card Reader to be used is. In most cases it will be “1”. The size of the CF Card should also be displayed in the "Remarks" column.
- All Volumes will now be listed. Select the volume you wish to backup and click the "Copy to file" button.
- You will now be asked where to save the backup file. Select a location and a name then press the "Save" button.
- CiderPress will now start to read the Volume and save it to your PC. When it is done the popup progress window will close.
- Optional: You can now select other Volumes to backup if desired.
- Done!
Note: You could also use a utility to backup the whole CF Card like HDD Raw Copy. CiderPress however has the advantage of being able to open and utilize the backup Images it creates. So in the future you could copy files from the Images or access data if needed. You would not need to fully restore the Image as with other backup programs. Some Emulators can also access and use the Image files too. Raw Disk Copiers like HDD Raw Copy can however be useful if you would like to quickly duplicate a CF Card as it will copy the Partition information unlike CiderPress. So you do not need to run the MicroDrive/Turbo Setup Utility before restoring the HDD Raw Copy Image. This could be a useful backup method should the Setup Utility backup disk you made (see "Support: Backing Up - Setup Utility" above) ever becomes damaged, lost, or unusable.
Restoring A Backup Image To A CF Card: To restore a Volume:
- Insert the CF Card into your Reader. Allow a few seconds for it be recognized by your OS. DO NOT format the Card if prompted!
- Open CiderPress.
- Click on the "Tools" menu and select "Volume Copier (open volume).
- Select “Physical Disk X”. X is the disk number.
Note: Users with a Computer that has more than one Hard Drive or CF Reader will have to determine exactly which Drive the CF Card Reader to be used is. In most cases it will be “1”. The size of the CF Card should also be displayed in the "Remarks" column.
- Uncheck the "Open as read-only" option above the "OK" button.
WARNING: Data on your Volumes can now be over-written. Be careful, and make sure to select the correct Volume!
- Click the "OK" button to continue.
- All Volumes will now be listed. Select the volume you wish to restore an image to and click the "Load from file" button.
- Select the image file and click the "Open" button.
- CiderPress will prompt you to make sure you want to overwrite a Volume if there is data there, and you need to confirm "OK" to continue. If it is blank it will start loading the image.
- You can load multiple images if you wish.
- Done!
Support: CiderPress - Copying Files
Copy A File TO The CF Card:
- Insert the CF Card into your Reader. Allow a few seconds for it be recognized by your OS. DO NOT format the Card if prompted!
- Open CiderPress.
- Click on the "File" menu and select "Open Volume...".
- Select “Physical Disk X”. X is the disk number. Click the "OK" button to continue.
Note: Users with a Computer that has more than one Hard Drive or CF Reader will have to determine exactly which Drive the CF Card Reader to be used is. In most cases it will be “1”. The size of the CF Card should also be displayed in the "Remarks" column.
- Uncheck "Open as read only" and click the "OK" button.
- All Volumes and folders will now be listed. Locate the volume, and folder if desired, in which you wish to place the copied file.
- Roots of Volumes can be identified by the double name such as "MDVOL1::MDVOL1" for example.
- Folder and files can be identified by the name AFTER the ":" and the info listed in the "TYPE" column.
- Right click on the location, then select "Add Files...".
- Browse to the file's location, select any desired options, then click the "OK" button.
- You will now see the file located on the CF Card.
- Repeat as desired to add more files.
- Done!
Copy A File FROM The CF Card:
- Insert the CF Card in to your Reader. Allow a few seconds for it be recognized by your OS. DO NOT format the Card if prompted!
- Open CiderPress.
- Click on the "File" menu and select "Open Volume...".
- Select “Physical Disk X”. X is the disk number. Click the "OK" button to continue.
Note: Users with a Computer that has more than one Hard Drive or CF Reader will have to determine exactly which Drive the CF Card Reader to be used is. In most cases it will be “1”. The size of the CF Card should also be displayed in the "Remarks" column.
- All Volumes and folders will now be listed. Locate the volume, and folder if needed, in which the file wish to copy is located.
- Roots of Volumes can be identified by the double name such as "MDVOL1::MDVOL1" for example.
- Folder and files can be identified by the name AFTER the ":" and the info listed in the "TYPE" column.
- Right click on the location, then select "Extract...".
- Browse to the location you wish to copy the file to, select any desired options, then click the "OK" button.
- You will now see the file located where you selected.
- Repeat as desired to copy more files.
- Done!
Support: Using Mechanical Hard Drives
It is possible to use old mechanical Hard Drives on the MicroDrive/Turbo however Compact Flash is a much better solution. As noted in "Features" above: "[Compact Flash is] readily available, inexpensive, low power, noiseless, shock proof, removable, and last almost forever - things that can't be said about mechanical Hard Drives."
Steps to install and use a mechanical Hard Drive:
- First, remove the IDE to CF Adapter. The unit should just slide off when pulled. Be careful to not bend any pins on the IDE male header.
- Next, install a 40-pin IDE Cable.
- Next, if needed set your IDE Hard Drive to the correct "Primary" or "Secondary" setting.
- Finally, install the Hard Drive onto the IDE Cable.
Note: If the Hard Drive is powered from a secondary Power Supply you need to adhere to the following in order for all to work correctly:
- The GS has to be turned on first. The Power Supply to the Hard Drive is then turned on second. Wrong order and the drive may not spin up.
- The two Power Supplies must have a common ground. Without this the MicroDrive/Turbo may not see the Hard Drive.
- Be warned that most newer MicroDrive/Turbo boards have +5v connected to pin Pin 20 of the IDE Connector. Be sure to use a cable which DOES NOT have a cable pin connected, or you cut the cable pin.
Support: Using ADTPro, Uthernet, and MicroDrive/Turbo Together
An incompatibility exists in ADTPro versions 2.0.2 and earlier where ADTPro's Uthernet initialization interferes with the operation of the MicroDrive/Turbo running IIGS firmware. To be specific, if the MicroDrive/Turbo is in a slot number lower than the Uthernet or Uthernet II, ADTPro will not start . Even if you create and save an ADTPro Uthernet configuration to specify an Uthernet slot using a different computer, it still won't work. There are a number of solutions available:
- Use a version greater than 2.0.2 of ADTPro
- Move your MicroDrive/Turbo to a slot higher than your Uthernet or Uthernet II card (typical slots are 3 for Uthernet, and 7 for MicroDrive/Turbo)
- Use the //e version of firmware in your MicroDrive/Turbo.
Support: Running The Preinstalled Games
With the CF Card that comes with the MicroDrive/Turbo you will find a "IIE GAMES" and a "GS GAMES" folder. If you try to run the games you will receive an error message of "FILETYPE MISMATCH". First, run "BOOT.SYSTEM" which is a menu system for running the games correctly. Then select and run the game of your choice.
Self Powered IDE to CF Adapters
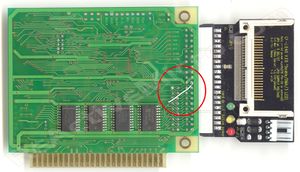
The MicroDrive/Turbo sold by ReActiveMicro comes with a self powered IDE to CF Adapter with a pre-setup CF Card. They did not sell boards with mechanical HDDs. "Self powered" refers to the IDE to CF Adapter which uses power supplied on Pin 20 of the IDE connector and does not require an external power source. This means the Apple II can supply power to the CF Card and no other power source is needed.
Boards from 2006 to mid 2008 will have +5v connected to Pin 20 of the IDE Connector in the form of a small jumper wire on the rear of the board. Later boards have a small trace added to the face, left side of the board. Over the years some users insisted on trying to install the CF Adapter backwards which would cause a short and burn the added trace from the board. So all boards from late 2017 and on have a fuse added to the small trace for added protection. The pic below on the right with the fuse is a good example of what the added trace looks like and where it is located.
- IDE Pin 20 Power Mods
-
 Pre-2008 MicroDrive/Turbo With Flywire Power Mod and Self Powered CF Adapter
 -
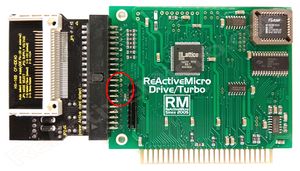 2018 MicroDrive/Turbo With "F1" Fuse and Self Powered CF Adapter


Support: Installing Firmware

The MicroDrive/Turbo usually comes pre-setup for Enhanced IIe or IIgs use. This is determined by the Firmware ROM which is installed on the card. The ROM is the small square IC on the upper right of the card. It is the only IC in a socket.
You can use the IIe Firmware in an Enhanced IIe and IIGS, however it is quite slow in a IIGS compared to the IIgs Firmware. You cannot use the IIGS Firmware in a IIe as it will cause the IIe to crash to Monitor.
The //e Firmware ROM is usually marked with a label that has "//e" written on it. This isn't the best way to check which firmware in on the MicroDrive/Turbo as the label could have been removed or fallen off. If your MicroDrive/Turbo works in an Enhanced IIe then the IIe Firmware is installed.
To remove the Firmware ROM you will need a "PLCC Extraction Tool". These can be found on eBay for under $5 usually. You can also use a paperclip, small wire, an awl, small screw driver, or any strong thin implement. Do not pry too hard on the ROM Socket if possible. Reference the picture for the areas on which to pry up.
The new Firmware ROM should be installed in the same orientation with the chip markings facing up. Installing the ROM backwards WILL damage it! Reference the picture and you will notice one corner of the Socket and ROM are "cut". The other corners are square. There is usually a "DOT" or mark on the case of the IC to help denote which side is which. In the case of the MicroDrive/Turbo we want to make sure the "cut corner" and the "DOT" are facing to the LEFT. The chip markings should be facing up, legible, with the gold Edge Connector (aka - Slot Edge) on the bottom of the MicroDrive/Turbo.
-
 MicroDrive-Turbo II, II+, IIe Unenhanced Firmware
Downloadable Files
- RM MicroDrive-Turbo
-
 2019 Manual
 -
 Software
 -
CF Images
-
Assorted Files