IIc+ Universal PSU: Difference between revisions
No edit summary |
No edit summary |
||
| Line 16: | Line 16: | ||
<strong>Support:</strong> Post on the [[{{TALKPAGENAME}}|Discussion]] page (link above) or email [http://store.reactivemicro.com/contact-us/ ReActiveMicro Support]. | <strong>Support:</strong> Post on the [[{{TALKPAGENAME}}|Discussion]] page (link above) or email [http://store.reactivemicro.com/contact-us/ ReActiveMicro Support]. | ||
<strong>Sales:</strong> Visit the [http://store.reactivemicro.com/shop/ ReActiveMicro Store] | <strong>Sales:</strong> Visit the [http://store.reactivemicro.com/shop/ ReActiveMicro Store]. | ||
| Line 33: | Line 33: | ||
== PSU Installation == | == PSU Installation == | ||
'''BEFORE YOU BEGIN BE SURE TO DISCONNECT THE AC POWER CABLE.'''<br> | |||
<ol> | |||
<li>Remove the screws from the bottom of the IIc+ case and remove the top of cove. This will allow removal of the power supply from the IIc+ chassis.</li> | |||
(A pic here would be nice.) | |||
<li>Once the top of the IIc+ is removed you will see the Power Supply enclosure. You will find it held in place by a plastic clip. Hold the clip to remove the enclosure as one piece.</li> | |||
(A pic here would be nice.) | |||
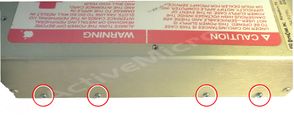
<li>Now that the Power Supply enclosure has been removed you can remove the two screws holding the cover in place. Now remove the cover of the enclosure.</li> | |||
<gallery class="center" widths=300px> | |||
File:IMG 20160414 182611 - Case Screws-Wiki.jpg | |||
</gallery></li><br> | |||
</ol> | |||
== Reviews == | |||
Javier A. Rivera received the first prototype and did a simple set of pictures documenting the install procedure to help others. Thanks Javier for the help! | |||
https://www.facebook.com/groups/5251478676/permalink/10157496148403677/ | |||
Revision as of 04:53, 30 September 2018

The Apple IIc+ Universal PSU is a Power Supply replacement designed by ReActiveMicro to be installed by the end user. It replaces the old Power Supply PCB with a new, modern solution while reusing the old Power Supply Enclosure.
The Apple IIc+ Universal PSU was conceived, created, and designed by Henry of ReActiveMicro and released for sale to the Apple II Community on September 29th, 2018.
When do you need a new power supply?
Good question! Although the answer should be obvious. Is it the original, 30+ year old PSU that came with the Apple? Then you need a new one. That simple.
"Rebuild or replace. Don't reuse." - ReActiveMicro.
How much more do you want or expect from a piece of equipment that was only designed to last a few years at most? Do you really believe Apple designed the power supply to last 30+ years? Most people either unaware of the potential dangers of continuing to use an old PSU or are of the mindset "If it ain't broke, don't fix it." Luckily when most Apple II power supplies fail they don't cause damage, or at least none which is apparent. However there is growing evidence when some power supplies fail the Apple II system in which they failed start to have intermittent issues a period of time after the failure.
It is highly recommended to fully rebuild your power supply or install a Universal PSU Kit. You should NOT rely on an original power supply in any case, or even one 'only' 10 years old, as it can be unreliable. It is also very hard, if not impossible, to fully test a power supply using common bench top tools. Labs use very expensive and specialized equipment specifically made for testing power supplies to certify and calibrate them. Transcat is one such company which not only calibrates your power supply but also documents how and why it fails certain tests. Costs however can rage in to the upper hundreds of dollars which is why most users decide to replace their power supply with something new and known good, or attempt a rebuild. However without the tools or knowledge to fully test and calibrate a rebuild you're back to just assuming things are working correctly.
Project Status: Complete. In production. Actively sold by ReActiveMicro.
Support: Post on the Discussion page (link above) or email ReActiveMicro Support.
Sales: Visit the ReActiveMicro Store.
Pre Installation Notes
Thanks for your support by purchasing your IIc+ Universal PSU from ReActiveMicro! To install your IIc+ Universal PSU you can reference the links below on this page which are the most up to date information, edited and reviewed by Community members like yourself. And in return, should you find something on this page could be worded or documented better you are invited to create an account and edit things as you see fit. Please feel free to share you experience to help others, as others have shared their experiences to help you.
Generally the Kit can be installed in about 15 minutes and with only light skimming of the installation section on this page. And of course if you have any issues or questions please contact Support.
Tools Required:Philips Screwdriver, Small Slotted Screwdriver, Wire Cutters/Strippers, and Multimeter.
ALWAYS be sure to disconnect all power from your power supply before opening and upgrading the unit. And be sure to double and triple check the DC output voltages before reconnecting the power supply to your Apple II system. Rechecking will never be a bad idea and we always recommend it.
IMPORTANT NOTES: The Universal PSU design has an adjustable Output Voltage Potentiometer. It comes preset from the factory and locked in place with security adhesive. We HIGHLY RECOMMEND not adjusting it under any circumstances as it could cause damage to your Apple II and void your Universal PSU warranty. Only those with knowledge or need should ever adjust. You have been warned.
PSU Installation
BEFORE YOU BEGIN BE SURE TO DISCONNECT THE AC POWER CABLE.
- Remove the screws from the bottom of the IIc+ case and remove the top of cove. This will allow removal of the power supply from the IIc+ chassis. (A pic here would be nice.)
- Once the top of the IIc+ is removed you will see the Power Supply enclosure. You will find it held in place by a plastic clip. Hold the clip to remove the enclosure as one piece. (A pic here would be nice.)
- Now that the Power Supply enclosure has been removed you can remove the two screws holding the cover in place. Now remove the cover of the enclosure.
-

Reviews
Javier A. Rivera received the first prototype and did a simple set of pictures documenting the install procedure to help others. Thanks Javier for the help! https://www.facebook.com/groups/5251478676/permalink/10157496148403677/
Versions
The prototype IIc+ Universal PSU was produced on March 12th, 2018. Two units were produced. It featured an MTA156 connector on the AC side. Although this worked it was a bit more cumbersome than it needed to be. It was decided the connector would be changed and a production run of PSU be ordered.

v1.0 of the IIc+ Universal PSU was produced on May 6th, 2018. The AC connector was changed to a spring type which makes installation of the wires much simpler for the user.