No-Slot Clock: Difference between revisions
Khaibitgfx (talk | contribs) mNo edit summary |
m Link to UltraWarp page |
||
| (55 intermediate revisions by 3 users not shown) | |||
| Line 1: | Line 1: | ||
[[Image:Title_RM_No_Slot_Clock.svg| | [[Image:Title_RM_No_Slot_Clock.svg|440px|link=https://wiki.reactivemicro.com/images/1/11/Title_RM_No_Slot_Clock.svg]] | ||
[[Image:IMG_20200110_152844526_HDR-Store-tiny.png|thumb|No-Slot Clock v1.0|link=https://wiki.reactivemicro.com/images/2/28/Nsc.png]] | [[Image:IMG_20200110_152844526_HDR-Store-tiny.png|thumb|No-Slot Clock v1.0|link=https://wiki.reactivemicro.com/images/2/28/Nsc.png]] | ||
The No-Slot Clock project was started about mid 2014 by Henry from [[ReActiveMicro]], and was officially released on April 12th, 2015. It was inspired by his work on the [[DClock]] project. The No-Slot Clock will fit in the Apple //c and //c | The No-Slot Clock project was started about mid 2014 by Henry from [[ReActiveMicro]], and was officially released on April 12th, 2015. It was inspired by his work on the [[DClock]] project. The No-Slot Clock will fit in the Apple //c and //c Plus, however not with RAM Card installed. | ||
Theory of Operation: The "/CE" | Theory of Operation: The "/CE" Chip Enable signal from the motherboard's DIP Socket passes through the DS1215 Clock IC. When the DS1215 Clock IC recognizes a certain sequence of bits on address lines A0 and A2 the ROM's "/CE pin" is held high by the DS1215 Clock IC which ''disconnects'' the ROM from the data bus. This allows software to communicate directly with the DS1215 Clock IC without conflicting the ROM. | ||
<strong>Product Status:</strong> Actively sold by ReActiveMicro. RM is working on other versions of this project, specifically for the II, II | <strong>Product Status:</strong> Actively sold by ReActiveMicro. RM is working on other versions of this project, specifically for the II, II ''plus'' and the IIc. We will post links to those pages once the projects have officially started. | ||
<strong>Support:</strong> Post on the [[{{TALKPAGENAME}}|Discussion]] page (link above) or email [https://store.reactivemicro.com/contact-us/ ReActiveMicro Support]. | <strong>Support:</strong> Post on the [[{{TALKPAGENAME}}|Discussion]] page (link above) or email [https://store.reactivemicro.com/contact-us/ ReActiveMicro Support]. | ||
| Line 19: | Line 19: | ||
See [[#Downloadable Files|Downloadable Files]] section for install guides with pictures and more in-depth information. This section is for basic instructions. | See [[#Downloadable Files|Downloadable Files]] section for install guides with pictures and more in-depth information. This section is for basic instructions. | ||
Install the No-Slot Clock under the CD or CF ROM in the IIe, and under the MON ROM in the IIc. It can also be installed under most slot based card ROMs which are 28 pins. Be sure to always install the IC with the 'notches' all in the same direction or you will damage your ROM and possibly the No-Slot Clock. It | Install the No-Slot Clock under the CD or CF ROM in the IIe, and under the MON ROM in the IIc. It can also be installed under most slot based card ROMs which are 28 pins. Be sure to always install the IC with the 'notches' all in the same direction or you will damage your ROM and possibly the No-Slot Clock. | ||
It is recommended to start all the legs of the ROM entering the No-Slot Clock socket. Then lay the No-Slot Clock on the face of the ROM on a flat serface like a desk. Then press from the bottom of the No-Slot Clock to seat the ROM. This prevents any stress being placed on the legs of the No-Slot Clock. Alternatively, you could first install the No-Slot Clock in the ROM's socket. Then install the ROM in the No-Slot Clock. Whatever you chose to do, don't try to install the ROM in to the No-Slot Clock by just pressing down with the No-Slot Clock legs supporting the pressure or you may bend them and cause one or more to break. | |||
<gallery class="center" widths=300px heights=220 caption="Align Notches"> | <gallery class="center" widths=300px heights=220 caption="Align Notches"> | ||
File:IMG_20200110_153749318-Wiki-tiny.png|link=https://wiki.reactivemicro.com/images/b/b8/IMG_20200110_153749318-Wiki-tiny.png | File:IMG_20200110_153749318-Wiki-tiny.png|link=https://wiki.reactivemicro.com/images/b/b8/IMG_20200110_153749318-Wiki-tiny.png | ||
</gallery> | </gallery> | ||
The time and date for the No-Slot Clock can set using the setup utility. See [[#Downloadable Files|Downloadable Files]] section for disk image download. | The time and date for the No-Slot Clock can set using the setup utility. See [[#Downloadable Files|Downloadable Files]] section for disk image download. | ||
The No-Slot Clock comes with two preinstalled CR1025, 10mm, coin cell batteries. These should last about 1 year of the computer remaining off. The set time may drift slightly when the No-Slot Clock and the Apple II aren't powered up for long periods of time. 'BAT1' is the primary battery. When it is too exhausted to keep the oscillator running the Real Time Clock IC will automatically switch over to 'BAT2'. You can remove either battery, one at a time, without losing the set time. However if you remove both at once then you will lose settings. ''' | The No-Slot Clock comes with two preinstalled CR1025, 10mm, coin cell batteries. These should last about 1 year of the computer remaining off. The set time may drift slightly when the No-Slot Clock and the Apple II aren't powered up for long periods of time. 'BAT1' is the primary battery. When it is too exhausted to keep the oscillator running the Real Time Clock IC will automatically switch over to 'BAT2'. You can remove either battery, one at a time, without losing the set time. However if you remove both at once then you will lose settings. | ||
'''For the best possible reliability it is recommended replacing both batteries once a year to provide the best experience and to minimize any possibility of damage due to leakage. Be sure to always use a well reviewed brand of battery'''. | |||
You are not required to use both coin cell slots at once. If you only want to use one cell, that's allowed. However it's recommended to not leave the slot open/not connected. Placing a small ball of tinfoil would be a good option to close the circuit. And in the future the foil could be removed and a new cell reinstalled. Another option is you can solder a small wire or even a set of header pins to allow use of an external (3v) battery. We added a small exposed copper area on the bottom side of the cell slot area to allow for more simple soldering. The other wire/jumper pin would be soldered to the cell slot body. | You are not required to use both coin cell slots at once. If you only want to use one cell, that's allowed. However it's recommended to not leave the slot open/not connected. Placing a small ball of tinfoil would be a good option to close the circuit. And in the future the foil could be removed and a new cell reinstalled. Another option is you can solder a small wire or even a set of header pins to allow use of an external (3v) battery. We added a small exposed copper area on the bottom side of the cell slot area to allow for more simple soldering. The other wire/jumper pin would be soldered to the cell slot body. | ||
<gallery class="center" widths=320px heights=200 caption="Connection Of External Power"> | <gallery class="center" widths=320px heights=200 caption="Connection Of External Power"> | ||
File:IMG_20200110_153542854_HDR-Wiki-tiny.png|Example Of Header Pins|link=https://wiki.reactivemicro.com/images/0/00/IMG_20200110_153542854_HDR-Wiki-tiny.png | File:IMG_20200110_153542854_HDR-Wiki-tiny.png|Example Of Header Pins|link=https://wiki.reactivemicro.com/images/0/00/IMG_20200110_153542854_HDR-Wiki-tiny.png | ||
</gallery> | </gallery> | ||
To remove the ROM from the No-Slot Clock we recommend using a tool such as an IC Lifter. The Wiha PN: 26810 is such a lifter that is well suited for this task. Be sure to only pry on the edges of the ROM, nearest to the socket. Do not pry up on the ROM from the center as is accustomed. If you do you risk prying on the battery which can damage the cell, cause it to leak, and also flatten the cell's holding tab and the cell to become lose. If you remove the ROM from the No-Slot Clock and notice the coin cell is not as secure as it once was, you can remove the cell and bend the holding tab slightly more down in the center of the cell holder. Replace the cell and you should notice it's more secure. | To remove the ROM from the No-Slot Clock we recommend using a tool such as an IC Lifter. The Wiha PN: 26810 is such a lifter that is well suited for this task. Be sure to only pry on the edges of the ROM, nearest to the socket. Do not pry up on the ROM from the center as is accustomed. If you do you risk prying on the battery which can damage the cell, cause it to leak, and also flatten the cell's holding tab and the cell to become lose. If you remove the ROM from the No-Slot Clock and notice the coin cell is not as secure as it once was, you can remove the cell and bend the holding tab slightly more down in the center of the cell holder. Replace the cell and you should notice it's more secure. | ||
<gallery class="center" widths=320px heights=200 caption="Removal Of ROM"> | <gallery class="center" widths=320px heights=200 caption="Removal Of ROM"> | ||
File:IMG_20200110_153749318-1Wiki-tiny.png|Only Pry Here|link=https://wiki.reactivemicro.com/images/9/91/IMG_20200110_153749318-1Wiki-tiny.png | File:IMG_20200110_153749318-1Wiki-tiny.png|Only Pry Here|link=https://wiki.reactivemicro.com/images/9/91/IMG_20200110_153749318-1Wiki-tiny.png | ||
</gallery> | </gallery> | ||
== History == | == History == | ||
| Line 54: | Line 66: | ||
== Versions == | == UM Versions == | ||
All previous UM versions are very similar. They all use SMT pads for the CR1025 Battery Holder, the Crystal, and DS1215 Clock IC. They all also offer two SMT pads for connection of an auxiliary power source. This could be supplied by soldering two .025 mil Square Pins to the SMT pads and using the [[IIgs_ROM0/1_Battery_Caddy]] or similar 2x AA/AAA Battery Caddy. | All previous UM versions are very similar. They all use SMT pads for the CR1025 Battery Holder, the Crystal, and DS1215 Clock IC. They all also offer two SMT pads for connection of an auxiliary power source. This could be supplied by soldering two .025 mil Square Pins to the SMT pads and using the [[IIgs_ROM0/1_Battery_Caddy]] or similar 2x AA/AAA Battery Caddy. | ||
| Line 71: | Line 83: | ||
*v1.3 was produced around August of 2015, however the design also had the same error as v1.2. The CAD software used was EZ-PC CAD and it is somewhat hard to control pads and layers. Henry then switched to KiCAD and fully relaid out the design. This version is the first to sport the new "UM" logo. It also was an attempt to resolve the time keeping issue. Henry found that the length of the connection between the DS1215 Clock IC and Crystal mattered, even as short as they were on the design. There most likely was a resonance issue. Henry also added a ground plane shield under the Crystal. | *v1.3 was produced around August of 2015, however the design also had the same error as v1.2. The CAD software used was EZ-PC CAD and it is somewhat hard to control pads and layers. Henry then switched to KiCAD and fully relaid out the design. This version is the first to sport the new "UM" logo. It also was an attempt to resolve the time keeping issue. Henry found that the length of the connection between the DS1215 Clock IC and Crystal mattered, even as short as they were on the design. There most likely was a resonance issue. Henry also added a ground plane shield under the Crystal. | ||
* | *v1.3 March of 2016. Henry now used KiCAD and had much better control of the design, which really shows in this version. The via for the /CE signal is now correct and not drilled out. The grounding plane shield now extends the full Crystal area and now runs under the DS1215 Clock IC. The connections between the DS1215 Clock IC and Crystal are now of the same length and also shielded with the ground plane. There is also the new, now legible "UM" logo as well as larger name and version information. Lastly, this design now features the "notch" area and marking to allow the user to more easily identify Pin1 of the design when installing the No-Slot Clock. | ||
'''v1.3 was the last stable release version from UM.''' ''All issues mentioned above have been resolved.'' | |||
<gallery class="center" widths= | |||
<gallery class="center" widths=200px heights=200px caption="Different versions of the UM collaboration PCB"> | |||
File:2014-11-29_NSC_v1.0.png|NSC v1.0 | File:2014-11-29_NSC_v1.0.png|NSC v1.0 | ||
File:2015-01-22_NSC_v1.1.png|NSC v1.1 | File:2015-01-22_NSC_v1.1.png|NSC v1.1 | ||
</gallery> | |||
<gallery class="center" widths=200px heights=200px> | |||
File:2015-08-15_NSC_v1.3.png|NSC v1.3 EZ-PC CAD | File:2015-08-15_NSC_v1.3.png|NSC v1.3 EZ-PC CAD | ||
File:2016-03-08_NSC_v1.3.png|NSC v1.3 KiCAD | File:2016-03-08_NSC_v1.3.png|NSC v1.3 KiCAD | ||
</gallery> | </gallery> | ||
<gallery class="center" widths= | |||
<gallery class="center" widths=200px heights=100 caption="Assembled Units"> | |||
File:NSC-Dallas1.jpg|Height Comparison with Dallas | File:NSC-Dallas1.jpg|Height Comparison with Dallas | ||
File:NSC-Dallas2.jpg|Height Comparison with Dallas | File:NSC-Dallas2.jpg|Height Comparison with Dallas | ||
| Line 90: | Line 107: | ||
'''The ReActiveMicro No-Slot Clock v1.0 proto.'''<br> | '''Notable Design Issue.''' | ||
Using SIP Header Pins in old, inferior quality Sockets on the motherboard can cause "Socket Stretch". This is where the spring contacts in the motherboard Socket are deformed when the thicker SIP Header Pin is inserted. | |||
The issue only becomes apparent when the original ROM is reinserted into the motherboard Socket and doesn't make good contact. Symptoms mainly show as a system not booting and acting like the ROM isn't inserted in the motherboard Socket. Sometimes pressing firmly on the ROM will cause it to make temporary contact with the stretched Socket and the computer will start to work, only to fail again when pressure is removed from the ROM or the motherboard lightly tapped. | |||
The only solution is to replace the damaged Socket with a new, high quality one. | |||
A majority of Apple II systems seem to have issues with Socket Stretch, which is why ReActiveMicro products have started to make the move to use DIP Plugs and Lead Frame pins in place of Header Pins. Some Apple II systems don't exhibit Socket Stretch, however there is no known way to tell what systems won't be affected or were manufactured with lower quality Sockets. They all visually appear the same. | |||
== ReActiveMicro Revision == | |||
'''No-Slot Clock v1.0 proto.'''<br> | |||
Development started in late 2019 once Henry was able to source Lead Frame pins. The pin allow 'legs' to be mounted to the edge of a PCB, which creates a DIP module. The legs are identical to DIP ICs, so there's no longer any socket stretch issues as with all past UM designs. And the new design also allows for the project to be factory assembled to help reduce costs and allow for better stock and quality control. | Development started in late 2019 once Henry was able to source Lead Frame pins. The pin allow 'legs' to be mounted to the edge of a PCB, which creates a DIP module. The legs are identical to DIP ICs, so there's no longer any socket stretch issues as with all past UM designs. And the new design also allows for the project to be factory assembled to help reduce costs and allow for better stock and quality control. | ||
<gallery class="center" widths=150px heights=125 caption="New ReActiveMicro No-Slot Clock Design"> | <gallery class="center" widths=150px heights=125 caption="New ReActiveMicro No-Slot Clock Design"> | ||
File:IMG_20191123_124327410-FB%26Wiki-tiny.png|RM No-Slot Clock v1.0 Prototype | File:IMG_20191123_124327410-FB%26Wiki-tiny.png|RM No-Slot Clock v1.0 Prototype | ||
File:IMG 20191123 124341785-FB&Wiki-tiny.png|RM No-Slot Clock v1.0 Prototype | File:IMG 20191123 124341785-FB&Wiki-tiny.png|RM No-Slot Clock v1.0 Prototype | ||
</gallery> | |||
<gallery class="center" widths=150px heights=125> | |||
File:IMG_20200110_152844526_HDR-Store-tiny.png|RM No-Slot Clock v1.0.4 Prototype Initial Release For Sale | File:IMG_20200110_152844526_HDR-Store-tiny.png|RM No-Slot Clock v1.0.4 Prototype Initial Release For Sale | ||
File:IMG_20200110_152931480-Wiki-tiny.png|RM No-Slot Clock v1.0.4 Prototype Initial Release For Sale | File:IMG_20200110_152931480-Wiki-tiny.png|RM No-Slot Clock v1.0.4 Prototype Initial Release For Sale | ||
| Line 102: | Line 136: | ||
</gallery> | </gallery> | ||
The | == Compatibility Issues == | ||
The RM No-Slot Clock design has been well tested in many Apple II Personal Computer Systems. | |||
=== Microsoft Z-80 SoftCard === | |||
The original driver's probe routine will lock up the machine if a Microsoft Z-80 SoftCard is installed. | |||
InexorableTash's[https://github.com/a2stuff/prodos-drivers] updated driver (available in the "Downloadable Files" section of this page) does not have this issue. | |||
=== WDC CPUs === | |||
The W65C02S and W65C816S microprocessors from Western Design Center appear to have a timing incompatibility that prevents the No-Slot Clock from being detected. | |||
Products affected by this issue include, but are not limited to: | |||
* [[UltraWarp]] by ReActiveMicro | |||
* FastChip //e by A2Heaven | |||
* Homebrew CPU replacements per the [https://www.westerndesigncenter.com/wdc/AN-002_W65C02S_Replacements.php Western Design Center application note] | |||
This can be ameliorated by installing the No-Slot Clock underneath the ROM on a card that interfaces to the Apple ][ bus with a 74LS245 bus transceiver, such as an Apple Super Serial Card or a Videx Videoterm 80-column card (but see below). | |||
Bobbi Webber-Manners has reported that inserting a load from somewhere in $C0xx in NS.CLOCK.SYSTEM results in proper detection of a No-Slot Clock installed on a card; this scheme does not work if the No-Slot Clock is installed underneath the CD ROM on the logic board. | |||
Her modified NS.CLKUW.SYSTEM can be found [https://github.com/bobbimanners/ProDOS-Utils here] | |||
This workaround has been incorporated into the updated NS.CLOCK.SYSTEM driver by InexorableTash (available in the "Downloadable Files" section of this page) | |||
=== 24-pin ROMs === | |||
The No-Slot Clock is designed to be installed under 28-pin ROMs, and therefore is not compatible out-of-the-box with 24-pin ROMs. | |||
However, the No-Slot Clock can be modified to work with a 24-pin ROM. ReActiveMicro takes no responsibility for any resulting damage if the end user decides to perform the following modification. | |||
With that disclaimer out of the way, here's how: | |||
* connect pins 1, 26, 27, and 28 on the No-Slot Clock | |||
* install the No-Slot Clock into the 24-pin ROM socket with the bottom pins aligned (i.e., No-Slot Clock pin 3 connected to socket pin 1, 14 to 12, 15 to 13, and so forth) | |||
== Downloadable Files == | == Downloadable Files == | ||
<div class="new_window"> | <div class="new_window"> | ||
<gallery class="center" widths=150px heights=80 caption="RM No Slot Clock (NSC)"> | <gallery class="center" widths=150px heights=80 caption="RM No-Slot Clock (NSC)"> | ||
File:5.25floppy.jpg|InexorableTash's ProDOS Drivers|link=https://wiki.reactivemicro.com/images/0/00/Prodos-drivers-20231004.po | |||
File:5.25floppy.jpg|Current Setup and Test Disk|link=https://wiki.reactivemicro.com/images/1/10/SMT_1.4.dsk | |||
File:PDF_ICON.svg|Installation Guide //e 2019|link=https://wiki.reactivemicro.com/images/2/25/No_Slot_Clock_Installation_Guide_IIe_2019.pdf | File:PDF_ICON.svg|Installation Guide //e 2019|link=https://wiki.reactivemicro.com/images/2/25/No_Slot_Clock_Installation_Guide_IIe_2019.pdf | ||
Latest revision as of 20:31, 3 October 2023

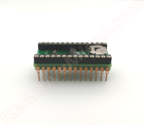
The No-Slot Clock project was started about mid 2014 by Henry from ReActiveMicro, and was officially released on April 12th, 2015. It was inspired by his work on the DClock project. The No-Slot Clock will fit in the Apple //c and //c Plus, however not with RAM Card installed.
Theory of Operation: The "/CE" Chip Enable signal from the motherboard's DIP Socket passes through the DS1215 Clock IC. When the DS1215 Clock IC recognizes a certain sequence of bits on address lines A0 and A2 the ROM's "/CE pin" is held high by the DS1215 Clock IC which disconnects the ROM from the data bus. This allows software to communicate directly with the DS1215 Clock IC without conflicting the ROM.
Product Status: Actively sold by ReActiveMicro. RM is working on other versions of this project, specifically for the II, II plus and the IIc. We will post links to those pages once the projects have officially started.
Support: Post on the Discussion page (link above) or email ReActiveMicro Support.
Sales: Visit the ReActiveMicro Store.
Installation & Information
See Downloadable Files section for install guides with pictures and more in-depth information. This section is for basic instructions.
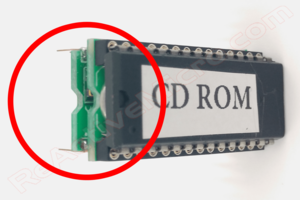
Install the No-Slot Clock under the CD or CF ROM in the IIe, and under the MON ROM in the IIc. It can also be installed under most slot based card ROMs which are 28 pins. Be sure to always install the IC with the 'notches' all in the same direction or you will damage your ROM and possibly the No-Slot Clock.
It is recommended to start all the legs of the ROM entering the No-Slot Clock socket. Then lay the No-Slot Clock on the face of the ROM on a flat serface like a desk. Then press from the bottom of the No-Slot Clock to seat the ROM. This prevents any stress being placed on the legs of the No-Slot Clock. Alternatively, you could first install the No-Slot Clock in the ROM's socket. Then install the ROM in the No-Slot Clock. Whatever you chose to do, don't try to install the ROM in to the No-Slot Clock by just pressing down with the No-Slot Clock legs supporting the pressure or you may bend them and cause one or more to break.
- Align Notches
The time and date for the No-Slot Clock can set using the setup utility. See Downloadable Files section for disk image download.
The No-Slot Clock comes with two preinstalled CR1025, 10mm, coin cell batteries. These should last about 1 year of the computer remaining off. The set time may drift slightly when the No-Slot Clock and the Apple II aren't powered up for long periods of time. 'BAT1' is the primary battery. When it is too exhausted to keep the oscillator running the Real Time Clock IC will automatically switch over to 'BAT2'. You can remove either battery, one at a time, without losing the set time. However if you remove both at once then you will lose settings.
For the best possible reliability it is recommended replacing both batteries once a year to provide the best experience and to minimize any possibility of damage due to leakage. Be sure to always use a well reviewed brand of battery.
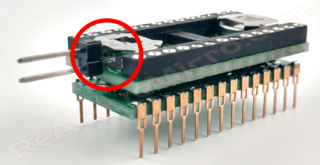
You are not required to use both coin cell slots at once. If you only want to use one cell, that's allowed. However it's recommended to not leave the slot open/not connected. Placing a small ball of tinfoil would be a good option to close the circuit. And in the future the foil could be removed and a new cell reinstalled. Another option is you can solder a small wire or even a set of header pins to allow use of an external (3v) battery. We added a small exposed copper area on the bottom side of the cell slot area to allow for more simple soldering. The other wire/jumper pin would be soldered to the cell slot body.
- Connection Of External Power
-
Example Of Header Pins
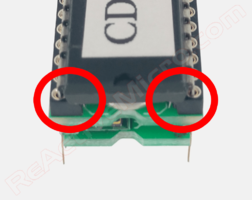
To remove the ROM from the No-Slot Clock we recommend using a tool such as an IC Lifter. The Wiha PN: 26810 is such a lifter that is well suited for this task. Be sure to only pry on the edges of the ROM, nearest to the socket. Do not pry up on the ROM from the center as is accustomed. If you do you risk prying on the battery which can damage the cell, cause it to leak, and also flatten the cell's holding tab and the cell to become lose. If you remove the ROM from the No-Slot Clock and notice the coin cell is not as secure as it once was, you can remove the cell and bend the holding tab slightly more down in the center of the cell holder. Replace the cell and you should notice it's more secure.
- Removal Of ROM
-
Only Pry Here
History
While working on the DClock project Henry learned how phantom real time clocks work. With this understanding he was able to see how a new and better No-Slot Clock design could be produced.
When Henry started the No-Slot Clock project he purchased back stock of the DS1215 Clock ICs from James Littlejohn of 8bitsystem.com on June 13th, 2014. James had abandoned the DClock project and wasn't using the stock Henry had previously sold to him.
Henry then started CAD and design work for his version of the No-Slot Clock to come up with a better design that didn't use two DIP Sockets soldered together, as Dallas did with their "SmartWatch" Clock design. The reason for this is not all signals are passed from the systems data bus to the ROM or RAM IC the DS1216E No-Slot Clock is installed under.
The initial v1.0 project was an Ultimate-Micro collaboration. All Ultimate-Micro releases bare the UM logo. The last UM revision was v1.3 which was discontinued in 2016 when ReActiveMicro returned from hiatus.
Henry restarted Active development of the project in 2019. And on January 10, 2020 v1.0 of the project was officially release.
UM Versions
All previous UM versions are very similar. They all use SMT pads for the CR1025 Battery Holder, the Crystal, and DS1215 Clock IC. They all also offer two SMT pads for connection of an auxiliary power source. This could be supplied by soldering two .025 mil Square Pins to the SMT pads and using the IIgs_ROM0/1_Battery_Caddy or similar 2x AA/AAA Battery Caddy.
The footprint for the Crystal is designed in such a way to allow for several body styles. 1206, 4-SMD, and Surface Mount Cylindrical Can styles can all be used.
A CR1025 Battery Holder isn't available for the custom footprint on the PCB. As a result, when a unit is assembled the Battery Holder is modified to fit the board.
There is also a custom footprint used for the SIP Header Pins. They are used as the Socket for the ROM, and pass-through the PCB to make contact to the systems' DIP Socket on the motherboard. You will notice in the pics of the PCB that one via pad is NOT drilled out. This is to isolate the /CE signal as mentioned above. During assembly Henry uses a drill to make a hole on the top side that doesn't fully pass through the board. He then clips the leg from the SIP Header pin which allows the rest of the pins to fully seat flush to the PCB while maintaining the isolation of the /CE signal. He then solders the clipped pin leg to the bottom of the board.
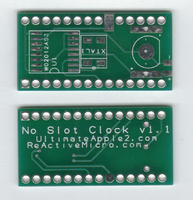
- v1.0 was produced about November 2014. While working with this design Henry noticed that some of the DS1215 Clock IC had issues. Some were slow. Some were fast. Some didn't advance the time at all. Henry assumed this was due to the Crystal and changed stock a few times in an attempt to resolve the issue. Henry also noticed the CR1025 Battery Holder could easily be broken off the PCB. Only a few v1.0 units were produced and mostly sent to beta testers.
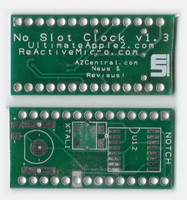
- v1.1 was produced about January 2015. This design allowed for a more sturdy PCB mounting of the CR1025 Battery Holder. The SMT pads now covered a lot larger area and were not as easily ripped off the PCB. This design however still suffered from the same issues with keeping time as with v1.0.
- v1.2 was produced around April of 2015, however the design had an error. The solid pad for the /CE signal was drilled out. So this design could not work.
- v1.3 was produced around August of 2015, however the design also had the same error as v1.2. The CAD software used was EZ-PC CAD and it is somewhat hard to control pads and layers. Henry then switched to KiCAD and fully relaid out the design. This version is the first to sport the new "UM" logo. It also was an attempt to resolve the time keeping issue. Henry found that the length of the connection between the DS1215 Clock IC and Crystal mattered, even as short as they were on the design. There most likely was a resonance issue. Henry also added a ground plane shield under the Crystal.
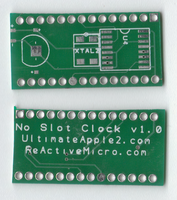
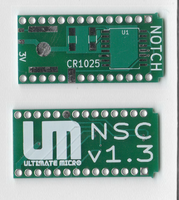
- v1.3 March of 2016. Henry now used KiCAD and had much better control of the design, which really shows in this version. The via for the /CE signal is now correct and not drilled out. The grounding plane shield now extends the full Crystal area and now runs under the DS1215 Clock IC. The connections between the DS1215 Clock IC and Crystal are now of the same length and also shielded with the ground plane. There is also the new, now legible "UM" logo as well as larger name and version information. Lastly, this design now features the "notch" area and marking to allow the user to more easily identify Pin1 of the design when installing the No-Slot Clock.
v1.3 was the last stable release version from UM. All issues mentioned above have been resolved.
- Different versions of the UM collaboration PCB
-
NSC v1.0
-
NSC v1.1
-
NSC v1.3 EZ-PC CAD
-
NSC v1.3 KiCAD
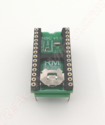
- Assembled Units
-
Height Comparison with Dallas
-
Height Comparison with Dallas
-
Top of Assembled Unit
Notable Design Issue.
Using SIP Header Pins in old, inferior quality Sockets on the motherboard can cause "Socket Stretch". This is where the spring contacts in the motherboard Socket are deformed when the thicker SIP Header Pin is inserted.
The issue only becomes apparent when the original ROM is reinserted into the motherboard Socket and doesn't make good contact. Symptoms mainly show as a system not booting and acting like the ROM isn't inserted in the motherboard Socket. Sometimes pressing firmly on the ROM will cause it to make temporary contact with the stretched Socket and the computer will start to work, only to fail again when pressure is removed from the ROM or the motherboard lightly tapped.
The only solution is to replace the damaged Socket with a new, high quality one.
A majority of Apple II systems seem to have issues with Socket Stretch, which is why ReActiveMicro products have started to make the move to use DIP Plugs and Lead Frame pins in place of Header Pins. Some Apple II systems don't exhibit Socket Stretch, however there is no known way to tell what systems won't be affected or were manufactured with lower quality Sockets. They all visually appear the same.
ReActiveMicro Revision
No-Slot Clock v1.0 proto.
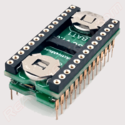
Development started in late 2019 once Henry was able to source Lead Frame pins. The pin allow 'legs' to be mounted to the edge of a PCB, which creates a DIP module. The legs are identical to DIP ICs, so there's no longer any socket stretch issues as with all past UM designs. And the new design also allows for the project to be factory assembled to help reduce costs and allow for better stock and quality control.
- New ReActiveMicro No-Slot Clock Design
-
RM No-Slot Clock v1.0 Prototype
-
RM No-Slot Clock v1.0 Prototype
-
RM No-Slot Clock v1.0.4 Prototype Initial Release For Sale
-
RM No-Slot Clock v1.0.4 Prototype Initial Release For Sale
-
RM No-Slot Clock v1.0.4 Prototype Initial Release For Sale
-
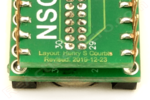
Closeup Of v1.0.4 Revision Information
Compatibility Issues
The RM No-Slot Clock design has been well tested in many Apple II Personal Computer Systems.
Microsoft Z-80 SoftCard
The original driver's probe routine will lock up the machine if a Microsoft Z-80 SoftCard is installed.
InexorableTash's[1] updated driver (available in the "Downloadable Files" section of this page) does not have this issue.
WDC CPUs
The W65C02S and W65C816S microprocessors from Western Design Center appear to have a timing incompatibility that prevents the No-Slot Clock from being detected.
Products affected by this issue include, but are not limited to:
- UltraWarp by ReActiveMicro
- FastChip //e by A2Heaven
- Homebrew CPU replacements per the Western Design Center application note
This can be ameliorated by installing the No-Slot Clock underneath the ROM on a card that interfaces to the Apple ][ bus with a 74LS245 bus transceiver, such as an Apple Super Serial Card or a Videx Videoterm 80-column card (but see below).
Bobbi Webber-Manners has reported that inserting a load from somewhere in $C0xx in NS.CLOCK.SYSTEM results in proper detection of a No-Slot Clock installed on a card; this scheme does not work if the No-Slot Clock is installed underneath the CD ROM on the logic board.
Her modified NS.CLKUW.SYSTEM can be found here
This workaround has been incorporated into the updated NS.CLOCK.SYSTEM driver by InexorableTash (available in the "Downloadable Files" section of this page)
24-pin ROMs
The No-Slot Clock is designed to be installed under 28-pin ROMs, and therefore is not compatible out-of-the-box with 24-pin ROMs.
However, the No-Slot Clock can be modified to work with a 24-pin ROM. ReActiveMicro takes no responsibility for any resulting damage if the end user decides to perform the following modification.
With that disclaimer out of the way, here's how:
- connect pins 1, 26, 27, and 28 on the No-Slot Clock
- install the No-Slot Clock into the 24-pin ROM socket with the bottom pins aligned (i.e., No-Slot Clock pin 3 connected to socket pin 1, 14 to 12, 15 to 13, and so forth)

