IIgs ROM0/1 Battery Caddy: Difference between revisions
Khaibitgfx (talk | contribs) No edit summary |
Khaibitgfx (talk | contribs) mNo edit summary |
||
| (2 intermediate revisions by the same user not shown) | |||
| Line 1: | Line 1: | ||
<!--T:1-->[[Image:Title_IIGS_Battery_Caddy.svg| | <!--T:1-->[[Image:Title_IIGS_Battery_Caddy.svg|440px|link=https://wiki.reactivemicro.com/images/d/d0/Title_IIGS_Battery_Caddy.svg]] | ||
| Line 26: | Line 26: | ||
== Pictures == <!--T:3--> | == Pictures == <!--T:3--> | ||
<gallery class="center" widths= | <gallery class="center" widths=300px heights=220> | ||
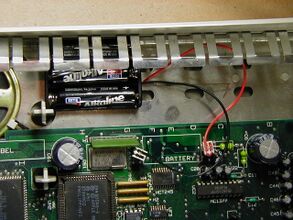
File:Battery_Caddy1.jpg|ROM0/1 Battery Caddy Installed | File:Battery_Caddy1.jpg|ROM0/1 Battery Caddy Installed | ||
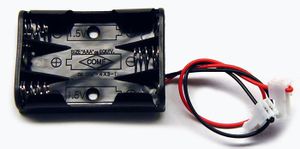
File:Battery_Caddy2.jpg|ROM0/1 Battery Caddy from 2006 | File:Battery_Caddy2.jpg|ROM0/1 Battery Caddy from 2006 | ||
Latest revision as of 13:57, 17 October 2020
The IIGS ROM0/1 Battery Caddy project was created by Henry from ReActiveMicro around March of 2006. The IIGS ROM0/1 Battery Caddy was sold primarily in the ReActievMicro Website Store.
Product Status: Active sold by ReActiveMicro.
History
While starting his collection of Apple IIGS systems, Henry noticed that a few had bad batteries in them. The ROM3 IIGS systems posed no issue in replacing the battery since they used a 1/2AA Battery Caddy on the motherboard. ROM0 and ROM1 IIGS systems, however, had their batteries soldered to the motherboard and really weren't user replaceable.
Henry gave this issue quite a bit of thought and after several months of testing he found a very effective solution in terms of simplicity and cost. He is also credited with the concept and design, and has freely offered it to be reused to help save Apple IIGS systems. In return Henry only asks that re-sellers of the design and concept credit ReActiveMicro on their sales page and instructions.
The Concept And Design
The battery in the ROM0 and ROM1 IIGS system connects to the motherboard using wire "legs". These legs can be easily cut close to the battery. This provides a simplistic way to remove the battery and also to reconnect a new one.
The new battery will be supplied using a Caddy (also known as a Battery Holder) with wire leads terminated with two 2Pin MTA100 Female Headers. The Caddy can hold any size cells, however AA or AAA size are most practical in terms of physical size, cost, and life span.
The MTA100 Female Headers are then mated with the old battery legs left on the IIgs motherboard. This allows for simple installation and removal, and is fully insulated.
At this point the procedure is done. The user may want to use some double-sided tape to mount the Caddy, however it's not required. Since the leads of the Battery Caddy can be of any size, the Caddy can be mounted outside the IIgs, further preventing any issues with battery leakage.
Sometimes the ROM0/1 Battery Caddy was sold as a three cell unit. This allowed a longer life span and less frequent battery changes. Fresh AAA batteries will output a full 3v only for the first couple of months of use, then they can quickly fall to 2.5v or lower due to heat from the Power Supply and system use.
Pictures
-
ROM0/1 Battery Caddy Installed
-
ROM0/1 Battery Caddy from 2006


