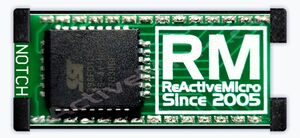
IIgs ROM1 Adapter: Difference between revisions
Khaibitgfx (talk | contribs) m →History |
Khaibitgfx (talk | contribs) mNo edit summary |
||
| (2 intermediate revisions by the same user not shown) | |||
| Line 1: | Line 1: | ||
[[Image:Title_IIGS_ROM1_Adapter.svg| | [[Image:Title_IIGS_ROM1_Adapter.svg|440px|link=https://wiki.reactivemicro.com/images/9/93/Title_IIGS_ROM1_Adapter.svg]] | ||
| Line 48: | Line 48: | ||
* Note the direction of the "notch" on the ROM. It should be facing towards the front of the IIGS case. | * Note the direction of the "notch" on the ROM. It should be facing towards the front of the IIGS case. | ||
* Gently pry up on the IIGS ROM with a small screw driver or IC Extractor / Lifter tool. You can protect the motherboard from scratching by laying paper or cardboard down on it first. | * Gently pry up on the IIGS ROM with a small screw driver or IC Extractor / Lifter tool. You can protect the motherboard from scratching by laying paper or cardboard down on it first. | ||
* Once the ROM is removed you can install the IIgs ROM1 Adapter into the empty socket. Be sure to install the "NOTCH" end of the Adapter pointing to the front of the | * Once the ROM is removed you can install the IIgs ROM1 Adapter into the empty socket. Be sure to install the "NOTCH" end of the Adapter pointing to the front of the IIGS case, as the original ROM was facing. | ||
Done! You may want to run the Self Test just to make sure all is still ok. However if the system boots with a beep like normal then it should be fine. | '''Done!''' You may want to run the Self Test just to make sure all is still ok. However if the system boots with a beep like normal then it should be fine. | ||
Your Apple IIGS | Your Apple IIGS Personal Computer system should now boot and be able to load the newest version of GS/OS. Enjoy! | ||
[[Category:Hardware]] | [[Category:Hardware]] | ||
[[Category:Apple]] | [[Category:Apple]] | ||
[[Category:ReActiveMicro Projects]] | [[Category:ReActiveMicro Projects]] | ||
Latest revision as of 13:51, 17 October 2020
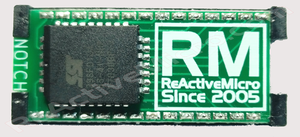
Current version from ReActiveMicro
The IIGS ROM1 Adapter converts a ROM 0 IIGS to a ROM1 by replacing the ROM on the motherboard. It allows an older Apple IIGS system to run newer software like GS/OS. It's user installable, and removable in case the IIGS needs to be downgraded. And unlike other solutions, this one does not block Slot 3 when using a ZIP-GSX or TransWarp GS.
The Adapter project was conceived of and created by Henry from ReActiveMicro.
Product Status: Complete. In production. Actively sold by ReActiveMicro.
Support: Post on the Discussion page (link above) or email ReActiveMicro Support.
Sales: Visit the ReActiveMicro Store.
History
Back in 2005 when Henry from ReActiveMicro first returned to the Apple II he found several IIgs systems obtained were ROM 0 and couldn't run GS/OS v6.0.1. He also found that some ROM0 IIgs users wanted to upgrade their systems to ROM1. However there isn’t a simple way to do so since Apple used a nonstandard ROM. Henry then found a way to use two Machine Pin Sockets to allow a 27C1001 EPROM to work in place of Apple’s 531000 OTP ROM IC.
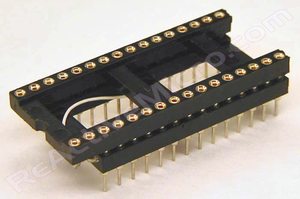
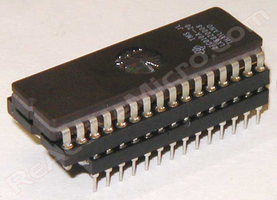
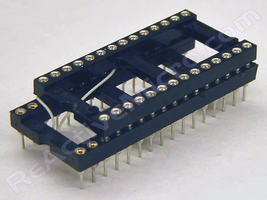
Two projects came from this research. One adapter allows for use of a more standard ROM to replace the ROM on the IIgs motherboard. The other adapter allowed for reading the less common 531000 ROM. These adapters however were made from machined pin sockets which also lead to "socket stretch" of the IIgs motherboard socket when used. They also blocked Slot 3 when using a ZIP-GSX or TransWarp GS.
-
IIGS ROM1 Adapter v1.0.
-
IIGS ROM1 Adapter v1.0 With ROM.
-
531000 Read Adapter v1.0. Emulates a 271001 ROM.
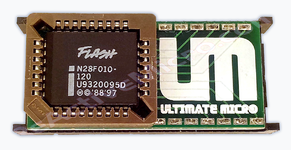
v2 of the project started on January 21st, 2016. It was technically a collaborative project with UltimateMicro2 and sold under the UM Brand, and was the last before ReActiveMicro's full return back to the retro scene in mid-July 2016. The project was released for sale on March 10th, 2016.
v2 of the adapter saw several improvements. A Dip Plug was used which solved the issue of "socket stretch". The ROM was also changed from a 27C1001 DIP to a N28F010 PLCC Flash ROM. This had an advantage of also letting users develop their own firmware, however none used the adapter for this. The unit was still hand assembled, which was a bit cumbersome due to the size of the PCB and parts. There also was the issue of blocking Slot 3 when using a ZIP-GSX or TransWarp GS.
-
IIGS ROM1 Adapter v2.0 from Ultimate-Micro.
v2.1 of the project started on August 23rd, 2018, and was released for sale on September 12th, 2018. Many users had started to demand the project make a return, and no one else was supporting the Community. So ReActiveMicro stepped up to help.
v2.1 of the adapter saw several improvements. A Dip Plug was used as with v2. However this time the whole adapter is fully factory programmed and assembled, which marks the new direction ReActiveMicro has taken since its full return back to the retro scene in mid-July 2016. The ROM is soldered to the PCB which allows for use of a ZIP-GSX or TransWarp GS and does not block Slot 3 like other adapters.
-
IIGS ROM1 Adapter v2.1 from ReActiveMicro.
Installation
Installation is simple.
- Note the direction of the "notch" on the ROM. It should be facing towards the front of the IIGS case.
- Gently pry up on the IIGS ROM with a small screw driver or IC Extractor / Lifter tool. You can protect the motherboard from scratching by laying paper or cardboard down on it first.
- Once the ROM is removed you can install the IIgs ROM1 Adapter into the empty socket. Be sure to install the "NOTCH" end of the Adapter pointing to the front of the IIGS case, as the original ROM was facing.
Done! You may want to run the Self Test just to make sure all is still ok. However if the system boots with a beep like normal then it should be fine.
Your Apple IIGS Personal Computer system should now boot and be able to load the newest version of GS/OS. Enjoy!

